Saturday, October 12, 2019

Third Time's a Charm! (Dry Rub Wings & Shrimp)

Tastiest wings and shrimp - pantry ingredients and
less time than takeout!
There have been times in my life when I thought we’d sprout feathers, we ate so much chicken. For the past couple of weeks, I thought we’d sprout wings.  

It all started with first 2019 post-season game for the Dodgers against the Nats...

...Flash back to last Sunday.... While doing my weekly swing thru Harris Teeter, I saw some great looking chicken wings in the poultry season so I snatched up the last package.  

The following night, after a full day at the home office, we needed something to eat as our beloved Dodgers faced the Nationals in what we hoped would be the first of many games leading to a World Series Win. Takeout seemed like such a copout. And then I remembered -- the wings!

With minutes to spare, I threw a bunch of herbs and spices in a bowl to make a dry rub. Then I splashed a glug of olive oil on the wings, let 'em rest a bit to allow the flavors to develop and roasted those babies in a 400 degree oven.  Wowzier! They were great! And the Dodgers won! So of course, being the superstitious Dodger Fans that we are, we had to have the exact same dinner the next night for the next game.

Tuesday rolled around. Another long day at the home office.  Another game. Steve dashed off to the Teeter for more wings. Back to the kitchen…. and this time I wrote down what I did. But I also changed the recipe up a tad and, darn it, they were a bit off. The Dodgers lost that night, and eventually were eliminated by the Nationals, but I’m not taking the blame.

Now I was determined. The Dodgers may have gone fishing for the year, but not me.

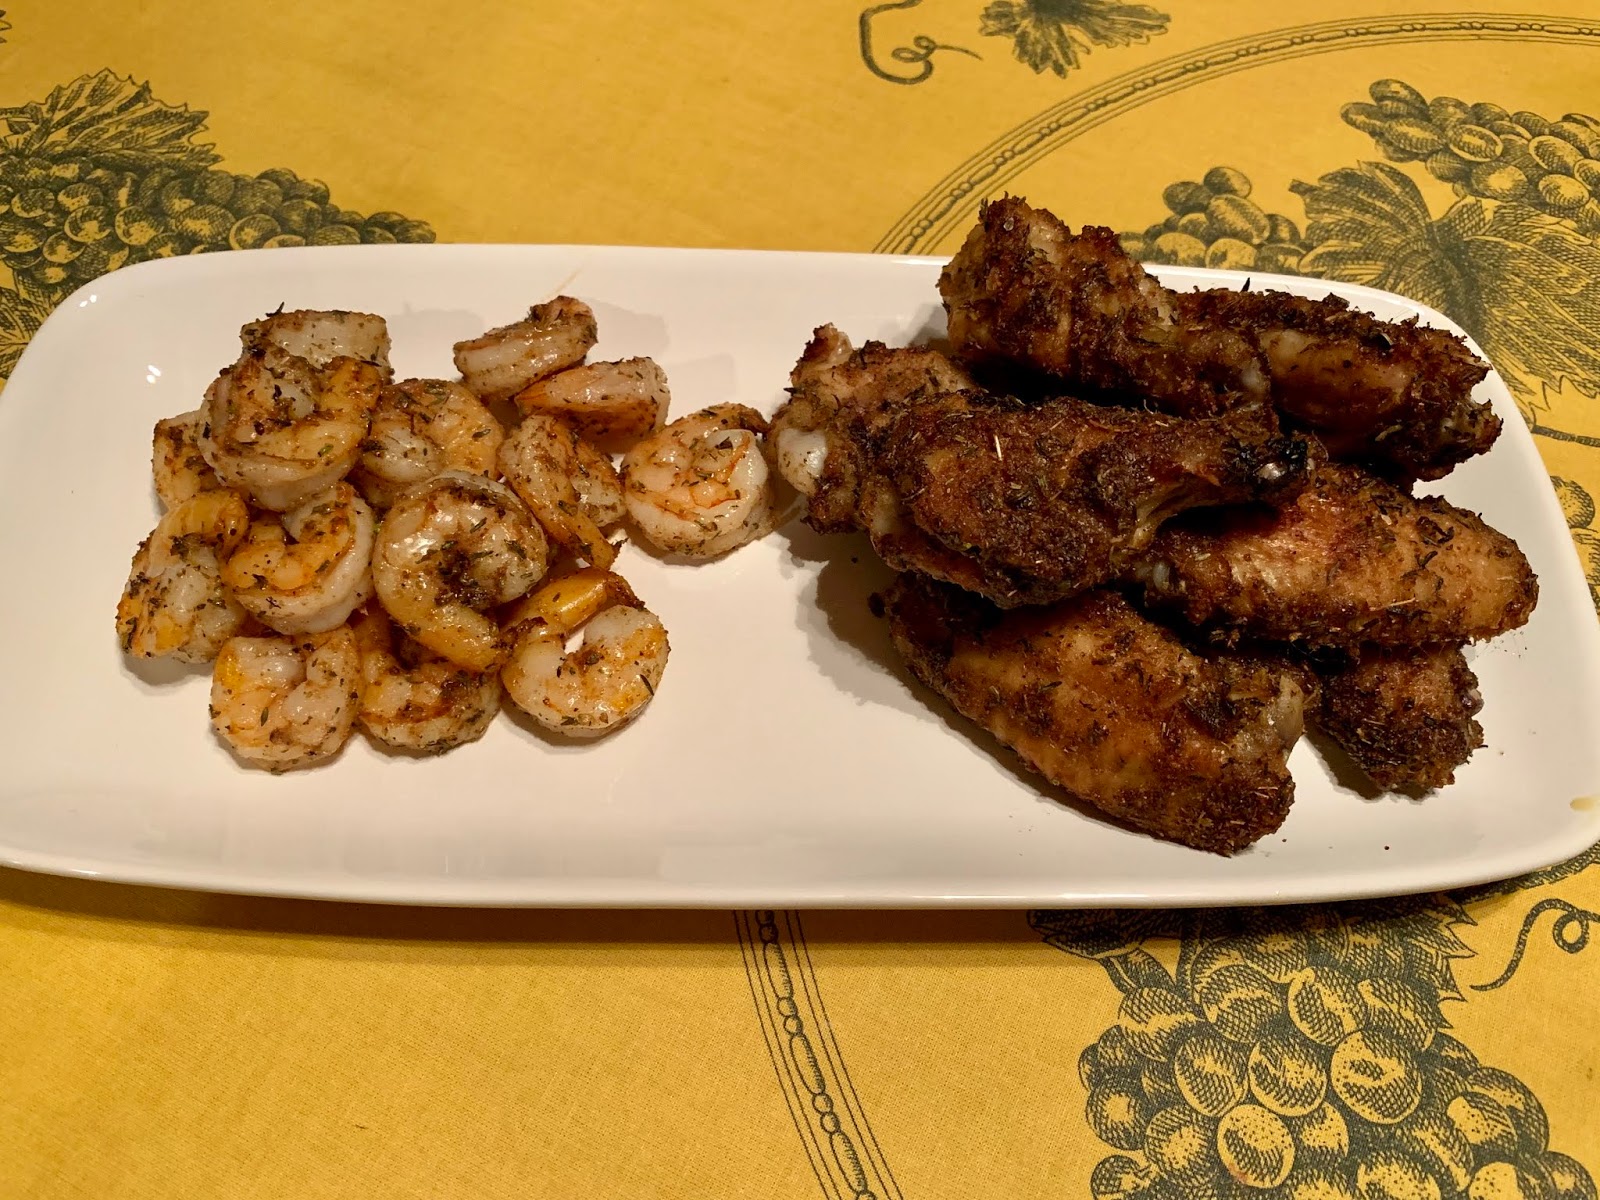
So last night, for yet another game (sans Dodgers). I whipped up my third batch. Less salt. Less cumin (the first time I've ever uttered those words). More rosemary. I also thawed and cleaned some shrimp to see how my concoction works with a different protein.

Bingo!

Both the wings and the shrimp were absolutely delish and deemed blog-worthy.

So here you are…. the ingredients and the method. The measurements in the recipe below made enough for 10-12 wing halves, a couple of handfuls of small/medium size shrimp, plus leftovers that really livened up our eggs this morning and a bit more that will probably be sprinkled on roasted cauliflower tonight.  I'm sure you can make more or even less (why?), just keep the proportions the same. Store leftovers in an air-tight container.
Enjoy!


Dry Rub Wings (& Shrimp)

Dry Rub Ingredients
  • 1 ½ tsp granulated garlic 
  • 1 ½ tsp dried thyme
  • 1 tsp kosher salt
  • 1 tsp smoked paprika
  • 1 tsp dried oregano
  • 1/2 tsp ground cumin
  • 1 tsp ground coriander
  • 1 1/2 tsp finely chopped fresh rosemary
  • 20 grinds black pepper
  • Olive oil to coat 
  • Protein of your choice: chicken wings and/or shrimp 

Method
Preheat oven to 400 degrees
Place a rack on a foil-lined baking sheet and spray it down with cooking spray
  • Mix the dry rub ingredients in a small bowl set aside
  • Pat the wings (and/or shrimp) dry with towels to remove any moisture and then toss them with a few tablespoons of olive oil in a large bowl. If you are doing both chicken and shrimp, do this in separate bowls. Then toss everybody with enough of the dry rub to coat. I do this in stages, sprinkling the rub on a little at a time and stirring gently to make sure they are evenly coated.
  • Arrange the wings/shrimp on separate prepared baking sheets and set them aside to rest for about 10-15 minutes to help the flavors develop.
  • For the chicken:  Slide the trays into the oven and roast for 25 minutes. Remove, flip each one over and then return to the oven for another 20 minutes. Remove from the oven and let rest on the wire rack for 10 minutes
  • For the shrimp: roast at the same temperature but for only 8-10 minutes, depending upon the size of the shrimp. When doing both wings and shrimp, do this while the wings are resting. The shrimp can be served right out of the oven.
  • Enjoy with celery sticks, sliced cucumbers, sliced red bell peppers and plenty of good quality or homemade bleu cheese dressing (we like Marie’s from the refrigerated section in the product department at most grocery stores). I also made a pesto dipping sauce by combining some pesto I froze during the summer with some mayo and lemon juice, which was amazing with the shrimp.

I bet you have all these ingredients
in your pantry!
Patience... wait a few minutes
before roasting for max flavor


Sunday, July 21, 2019

Crowd Pleaser (Cilantro-Lime Pepita Dressing/Dip)


We got together with friends last night for a fantastic dinner of InstantPot  pork tacos (cooked with plums and peppers - it was amazing!), great wine and conversation that ranged the gamut from belly laughs to solving the problems of the universe. So much fun.


Ready for dipping...
When I was asked to bring an app, my mind immediately went to a crisp and cool (it's freaking hot here) veggie platter. First I thought bleu cheese dip. Then I thought yogurt ranch. And then - boom!- I thought about my very favorite dressing recipe that I created way back when we lived in Brea, California. Cilantro-Lime-Pepita dressing that is reminiscent of the fantastic Mexican Caesar Salad served at the El Torito restaurant on the hill above the town, by Brea Olinda High School. 

While I often just throw this together, I wanted this batch to be just right. So, I searched the blog and couldn't find it. Thankfully I had a copy on my laptop from when I tested it for Southerly Magazine. 

So here it is, two ways - photographed as a dip and as a dressing with grilled shrimp and garnished with Cojita Cheese. (I used to put 1/8 of a cup of the cheese into the dressing, but lately I've been leaving it out and really like the light and press taste that results. Your call to leave it in or leave it out!
.... and as a salad with grilled shrimp and Cojita cheese

Here's how you can make it: 


Dressing/Dip Ingredients
(makes a little more than 1 cup, plenty for dipping with leftovers)
  • 1 large garlic clove, peeled
  • 1 7oz  Greek Yogurt (full-fat, 2%, 1% or 0% - it doesn't matter as long as it's Greek Yogurt - I use Fage brand)
  • 1 T mayonnaise
  • 1/8 cup cider vinegar
  • Juice and zest of one lime
  • 1/2 tsp kosher salt
  • ½ tsp ground black pepper
  • 1 bunch cilantro, washed, dried and stems removed (just twist ‘em off; no need to get crazy about removing every little stem)
  • 1/8 cup pepitas (Mexican pumpkin seeds, found in the nut section)
  • 1/8 cup queso fresco (Mexican cheese that you can crumble, available at most grocery stores), plus the same amount for garnish.

Dressing Directions:
In the food processor with steel blade:

  • Blitz all of the ingredients except the cilantro until smooth
  • Then add the cilantro and pulse until cilantro is finely chopped and incorporated into the mixture
  • Check the seasoning and add more salt to taste if needed.

Sunday, June 30, 2019

It's Haaaat (Summertime Shrimp & Avocado Lettuce Cups)


Cool and refreshing.... summer captured in a lettuce cup!
It is officially summer. And whenever the tempreatures rise like this, I have to think of the Seinfeild episode what Elaine and Jerry spend the night at Jerry's parents' condo in Florida. If you don't remember it, search for the episode titled, The Pen, and prepare to laugh. But I digress......

The temps are in the 90s now and the humidity is starting to catch up as well. I'm continually surprised at how we've adapted, but as the days get hotter and more humid, a cold dinner can be just the ticket. That’s where this dish comes in. 

I made this today so I could photograph it for the August issue of Southerly. Steve just walked in -- haaaat off the golf course -- and took a taste. Big thumbs up.

So as the temps rise, I hope you give this a try.  

Granted, you have to turn the oven on to roast the shrimp, but the results are so succulent that you’ll get over it!

Ingredients
1 lb. shrimp, (I like 16-20 size), peeled and deveined 
1 clove garlic, finely minced
2 TBS olive oil
2 ripe avocados, cut into large chunks
1/2 red bell pepper,  medium sized dice (save the other half for snacking)
1/2 orange bell pepper, medium sized dice (same as above)
3/4 cup English cucumber (the long ones sold in plastic that you don’t have to peel), medium dice
1/2 cup sweet onion, small dice
1/2 cup whole cilantro leaves
1 TBS finely chopped cilantro leaves
1/4 cup lime juice (typically 1 large lime if it’s juicy) + the zest from one lime
1/4 tsp ground coriander
Kosher salt and fresh cracked black pepper
1 head bib lettuce, washed, dried and divided into individual leaves. (You can also use iceberg lettuce, prepping it in a similar manner.)

Method:
  • Preheat the oven to 400 degrees and line a baking sheet with parchment. )You can use foil, but I prefer parchment.)
  • Toss the shrimp, garlic, olive oil, 1/2 tsp kosher salt and 10 grinds of black pepper in a medium sized bowl and then tip it all out onto the lined baking sheet. Pop this in the oven and set a timer for 8 minutes. Check them when the timer goes off - if they don’t look done, set the timer for another 2 minutes and you should be good to go.  You don’t want overcooked shrimp! 
  • When the shrimp are done, pull the pan from the oven and let it cool for about 5 minutes. Then pull up the paper on two sides and pour the shrimp and their juices into a glass bowl. Put this into the ‘fridge until chilled (about 15 - 20 minutes)
  • While the shrimp is chilling, gently (don’t smush the avocado!) combine the bell pepper, cucumber, onion, cilantro, lime juice, coriander, 1 tsp kosher salt and 10 grinds of black pepper in a large glass bowl. Then add the chilled shrimp to the mixture, stir to combine. Cover with plastic wrap and chill until ready to serve. 
  • To serve, let everyone spoon the mixture into lettuce leaves and eat as you would a taco. (Or skip that whole process and enjoy it as a side salad.)


Enjoy.

Sunday, June 2, 2019

Happy Graduation! (Frozen Banana Bites)


It's that time of year! And around here it seems like everywhere you turn there is a freshly minted graduate -- Duke, UNC, NC State, NC Central, Elon,  -- and that doesn't even start to include the high schools. 

One of my dearest friend's daughter Maddie is one of those grads
Bite-Sized Frozen Banana? Yes, ma'am!
and is a 
proud owner of a fresh new Elon MBA. To celebrate the big day, her folks hosted a party at their home a couple of weekends ago. And what a party it was!

While the event was catered, another friend and I volunteered to bring the desserts.  Those who know me well know that I'm not big on creating desserts. And making something that would be enjoyed (or not) by 50+ people was a bit overwhelming. Thankfully my cohort in dessert crime pointed sent me this recipe 

Reminiscent of a beachside frozen banana on a stick, these frozen treats are cool, tasty and actually not bad for you! They’re also super simple to make and would make a fun rainy day project with the kiddos. While this isn’t an original recipe, it’s such a crowd pleaser that I had to share. 

Here's how you make them:

Ingredients:
Makes 20 to 45 pieces depending upon the size of the bananas. They’ll keep in the freezer for a week or two, if you can keep yourself from eating them!

  • 2-4 bananas (select just ripe ones — this is not a great use for super ripe bananas)
  • 12 oz semi-sweet chocolate, chopped (I use the kind you’ll find in the baking section; just be sure it is semi-sweet and not unsweetened)
  • 2/3 cup chopped almonds

Method
  • Line a baking sheet with wax paper and clear a space in the freezer the same size as the sheet.
  • Peel and slice the bananas into 1/2 to 3/4 inch slices.
  • Fill a sauce pan with about 3 inches of water and bring it to a simmer. Then place a glass bowl on top of the pan, put the chocolate in the bowl and stir gently until melted. When chocolate is smooth, turn off the heat but leave the bowl over the hot water.
  • Now comes the fun part - using a fork, start dunking the banana slices into the chocolate 2 or 3 at a time. Lightly shake and tap the covered slices to remove excess chocolate (if there is such a thing). 
  • Use a second fork to slide the slices onto the prepared baking sheet, sprinkle on some nuts and press them lightly to be sure they settle into the chocolate.
  • Freeze until firm (abut 20 minutes) and then remove to an airtight container and freeze for up to two weeks.  Serve Frozen. 

Enjoy!


Sunday, April 28, 2019

Girl's Trip (Steak Lover's Salad with Steak Sauce Vinaigrette)

They had me at "Steak Sauce Vinaigrette" - I recreated
the salad at Old Ebbitt Grill with a few tweaks of my own
 
One of the things that most excited us when we moved to North Carolina was the opportunity to explore the "other" coast. As SoCal natives, had pretty much explored every nook and cranny of the western half of the country. The east coast, not so much. Moving to North Carolina was our chance to change that.  What I didn't anticipate was that we'd also expand the travel horizons of family and friends. 

Earlier this month I had the awesome opportunity to do just that, with my Bestie from the  Westie, Sheryl. Truly friends for life, Sheryl and I try to get away every year or so. And when I learned that she'd never experienced Our Nation's Capital, that pretty much cinched the destination for this year's trip. 


Besties for Life
Holly & Sheryl at Old Ebbitt Grill
Over the course of four days we walked, laughed, ate and drank our way though museums, monuments, and some amazing restaurants and watering holes. The salad recipe I'm sharing today was inspired by one of our favorite spots, Old Ebbitt Grill, which is located just a few blocks from the White House. 

An iconic DC restaurant and bar that is frequented by the powers that be, Old Ebbitt Grill is exactly what one might expect. Slightly Victorian with a bit of an "old boys club" air, but with a totally up to date vibe and menu.  
Picture perfect day at
The National Mall

Sheryl opted for the Steak Salad, and after one bite passed it over to me for a try. Wowzer! One taste of the Steak Sauce Vinaigrette and I had to figure out how to make it! 

Today, I had the opportunity to give it a shot, and deemed the result blog-worthy. The restaurant serves its version with bleu cheese and filet mignon, but we prefer New York strip and feta, so that's what you'll see below. I bet it would be good with chunks of a nice, aged cheddar or pieces of goat cheese as well. I honestly don't remember if they had pickled red onions on theirs, but I'm kinda on a picked onion kick and I gotta say, it adds a nice bit of zip. Ditto the pecans - seemed like a good way to add some crunch, so I sprinkled a few and really liked the result.

Here's how I did it:


Steak Lover's Salad with Steak Sauce Vinaigrette - Inspired by the Steak Salad at Old Ebitt Grill in Washington, DC
Serves 4

Ingredients
For the Salad:
  • 2 New York strip steaks, seasoned with salt, pepper and olive oil and grilled to your liking - we like our medium rare (about 4-5 minutes on each side depending upon the thickness of the steaks) and allowed to rest under a loose piece of aluminum foil for 10 minutes. Cut the steak into bite sized pieces.
  • 8 cups of mixed field greens (2 5oz bags)
  • 12 asparagus spears, woody ends cut off and blanched in boiling salted water and then removed to a bowl of ice and water to chill and then cut into bite sized pieces
  • 1 cup grape or cherry tomatoes, sliced in half
  • 8-10 mushrooms, thinly sliced
  • 4 oz feta cheese, cut into cubes

For the Steak Sauce Vinaigrette
  • 1 5oz bottle of A1 Steak Sauce (about 2/3 cup)
  • 1/3 cup apple cider vinegar
  • 1/3 cup olive oil
  • 1 TBS Dijon mustard
  • 1 TBS honey
  • 1/2 tsp Kosher salt
  • 1/4 tsp fresh ground black pepper

For the Pickled Onions:
  • 1/2 red onion, thinly sliced
  • 1 cup apple cider vinegar
  • 1/2 cup water
  • 1 TBS Kosher salt
  • 1 TBS sugar

For garnish - this salad need some crunch!:
  • 1/2 cup pecan halves, toasted in a dry pan

Method
  • At least one hour before you assemble the salad, mix the ingredients for the pickled onions in a jar. If you are doing the day of this can rest on the kitchen counter for an hour. If you are doing it ahead, you can stash it in the ‘fridge. They should keep for a week or so.
  • At the same time, shake the dressing ingredients in a small jar. It too can sit out for an hour or go into the fridge for a couple of weeks.
  • When you are ready to serve, toss the salad ingredients in a large bowl with enough of the dressing to coat, but not drench the greens. 
  • Portion the salad on four plates, and then top with the steak, pickled onions and pecans


Enjoy!

Sunday, March 31, 2019

I figured it out and made it my own! (Bolognese with Pasta and Lemon-Basil Gremolata)

A bit of nutmeg and cinnamon plus a fresh lemon-basil
gremolata make this bolognese a winner!
Wherever we go it seems like we end up in a quaint little Italian restaurant and Steve invariably orders the bolognese. I’ve tried to duplicate the dishes before, but something was always missing. 

This week, we celebrated our wedding anniversary at one of our favorite haunts that does a particularly good bolognese served with their hand cut pasta, and yes, Steve ordered his favorite dish. As she described the specials, our server noted that the chef adds a bit of nutmeg and cinnamon to his sauce.

Bingo! That’s what was missing!

So yesterday I wrote and then tested the recipe below and had one of our friends for an impromptu dinner. Thumbs up, all around the table!

To make the dish my own, I topped it with a lemon-basil gremolata that adds a bit of freshness to what could be a very heavy dish. I also used a very light textured pappardelle pasta, which kept things on the lighter side as well.

It spends a couple of hours in a low oven, so it really isn’t much of a fuss.  Here’s how I did it.  


Bolognese with Pasta and Lemon-Basil Gremolata

Ingredients:

For the Bolognese
1 lb ground pork
1 lb ground beef
2 cups grape tomatoes, cut in half
1 small can tomato paste
1 cup dry white wine
2 cups beef broth
2 TBS olive oil
4TBS butter, divided
1/2 cup onion, diced
1/2 cup celery, diced
1/2 cup carrot, diced
2 cloves garlic, minced
1 TBS dry oregano
1/4 tsp nutmeg
1/4 tsp ground cinnamon
1/4 cup cream or whole milk
1 package pappardelle  or fehttuchini pasta, cooked in salted water until al dente (follow directions on package)
Kosher salt and fresh ground black pepper
2-3 inches of Parmesan rind (save the rinds from fresh parmesan the freezer and toss them in soups, stews and sauces like this one)

 For the Gremolata: Combine in a small bowl:
1/4 cup fine chopped fresh basil
Zest of one lemon
1/4 cup parmesan cheese,
1/4 cup pine nuts


Method:
Heat the oven to 325 degrees

In a Dutch oven:

  • On a high heat, brown the beef and pork in the olive oil with a teaspoon Kosher salt and about 20 grinds black pepper, then drain away the grease and put the meat in a bowl covered with foil to keep warm. (Hint, if you have a cup style de-greaser, pour all of the juices and the fat from the pan into it with the beef broth. Then strain away the fat when you add the broth into the dish later)
  • Lower the teat to medium and add  2TBS of the butter to the pot snd sauté the onions until translucent, then add the garlic, carrots and celery and cook another 2 minutes. Add the can of tomato paste and cook for 2 minutes to develop its flavor.
  • Now add the meat back to the pot with the oregano, nutmeg, cinnamon and another 1/2 teaspoon of Kosher salt. Stir to combine and then add the wine and beef stock, raise the heat to bring to a boil; then turn off the heat, cover the pot with its lid and put the whole thing in the oven to cook low and slow for 90 minutes; then remove from the oven, stir in the milk and return to the oven, uncovered, for another 30 minutes. 
  • Remove from the oven, let cool for 10 minutes and then stir in the remaining 2 TBS of butter. 
  • To serve, put half of the sauce in a large skillet with the pasta and toss to coat, add some pasta water if necessary to coat completely. Then top each person’s serving with a scoop of the remaining sauce and garnish with the gremolata.


Enjoy!


Saturday, March 23, 2019

Celebrating Spring! (Chicken Primavera Risotto)

Asparagus, carrots, peas and chicken make a tasty
risotto that celebrates Spring
When we lived in SoCal, we took Spring for granted. Basically it meant that you could bring out your white pants and shoes. And there were Easter Lillys at the grocery store. 

Here in North Carolina, things are soooo different. The trees are popping with flowers and the neighborhood is awash with yellow daffodils and pink tulips. Windows are also thrown open, at least until the pollen hits. But that's a small price to pay for the incredible leafing out hardwood trees that provide perfect shade for lazy summer afternoons in a hammock.

So when I had to come up with a recipe for the May issue of Southerly (our neighborhood magazine) the following dish was an easy choice. Cheers to Spring! And bring on all things primavera!


Chicken Primavera Risotto
Serves 4-6

Ingredients
  • 5 1/2 cups chicken stock. If you only have a standard 4-cup box of broth, add in 1 1/2 cups of water and some garlic and/or poultry season to stretch it.
  • 3 boneless, skinless chicken thighs, cut into pieces and seasoned with salt and pepper
  • 3 Tbs Butter, divided
  • 2 Tbs olive oil
  • ½ cup onion, 1/4 inch dice
  • 1 ½ cups Arborio rice
  • ½  cup dry white wine 
  • 10 thin or 8 thick spears of asparagus, cut into ½ inch pieces
  • 1 cup frozen peas, uncooked
  • 1/2 cup each of diced carrots, onions, and halved cherry tomatoes
  • 1/8 cup chopped parsley
  • 1/2 cup Parmesan cheese, grated
  • 1/2 tsp poultry seasoning (or a few sprigs of thyme chopped)
  • Salt and Pepper to taste
  • Additional Parmesan cheese and cracked black pepper for garnish.

Method
  • Bring the chicken stock to a boil and then reduce the heat to low
  • Heat the olive oil in a large sauce pan or medium sized Dutch oven heat the olive oil and then brown the chicken in two batches until cooked through; remove to a bowl.
  • Now add the 2 tbs of the butter to the pan and sauté  the onion and carrots until the onions are translucent; then add the rice and stir until coated. Raise the heat to medium high and pour in the wine, stirring until fully absorbed. Then begin to add hot chicken stock in ½ cup increments, stirring now and then until absorbed before adding more. Hint: it’s time to add liquid when a spoon dragged thru the mixture creates a “canyon.” 
  • After about 10 minutes add the asparagus, tomatoes, peas, poultry seasoning and chicken. Continue adding broth as above, stirring to keep the rice from sticking to the bottom of the pot. After about 10 more minutes the rice will be tender, but still firm. At this point, add any remaining stock and stir until it is mostly absorbed, but still loose.
  • Now you are ready to finish the dish. Turn off the heat and vigorously stir in the  the remaining 1 Tbs of  butter, parsley and cheese.  Season with salt and pepper to taste.  Serve with additional Parmesan cheese and black pepper.


Enjoy.