Showing posts with label Seafood. Show all posts

Saturday, October 12, 2019

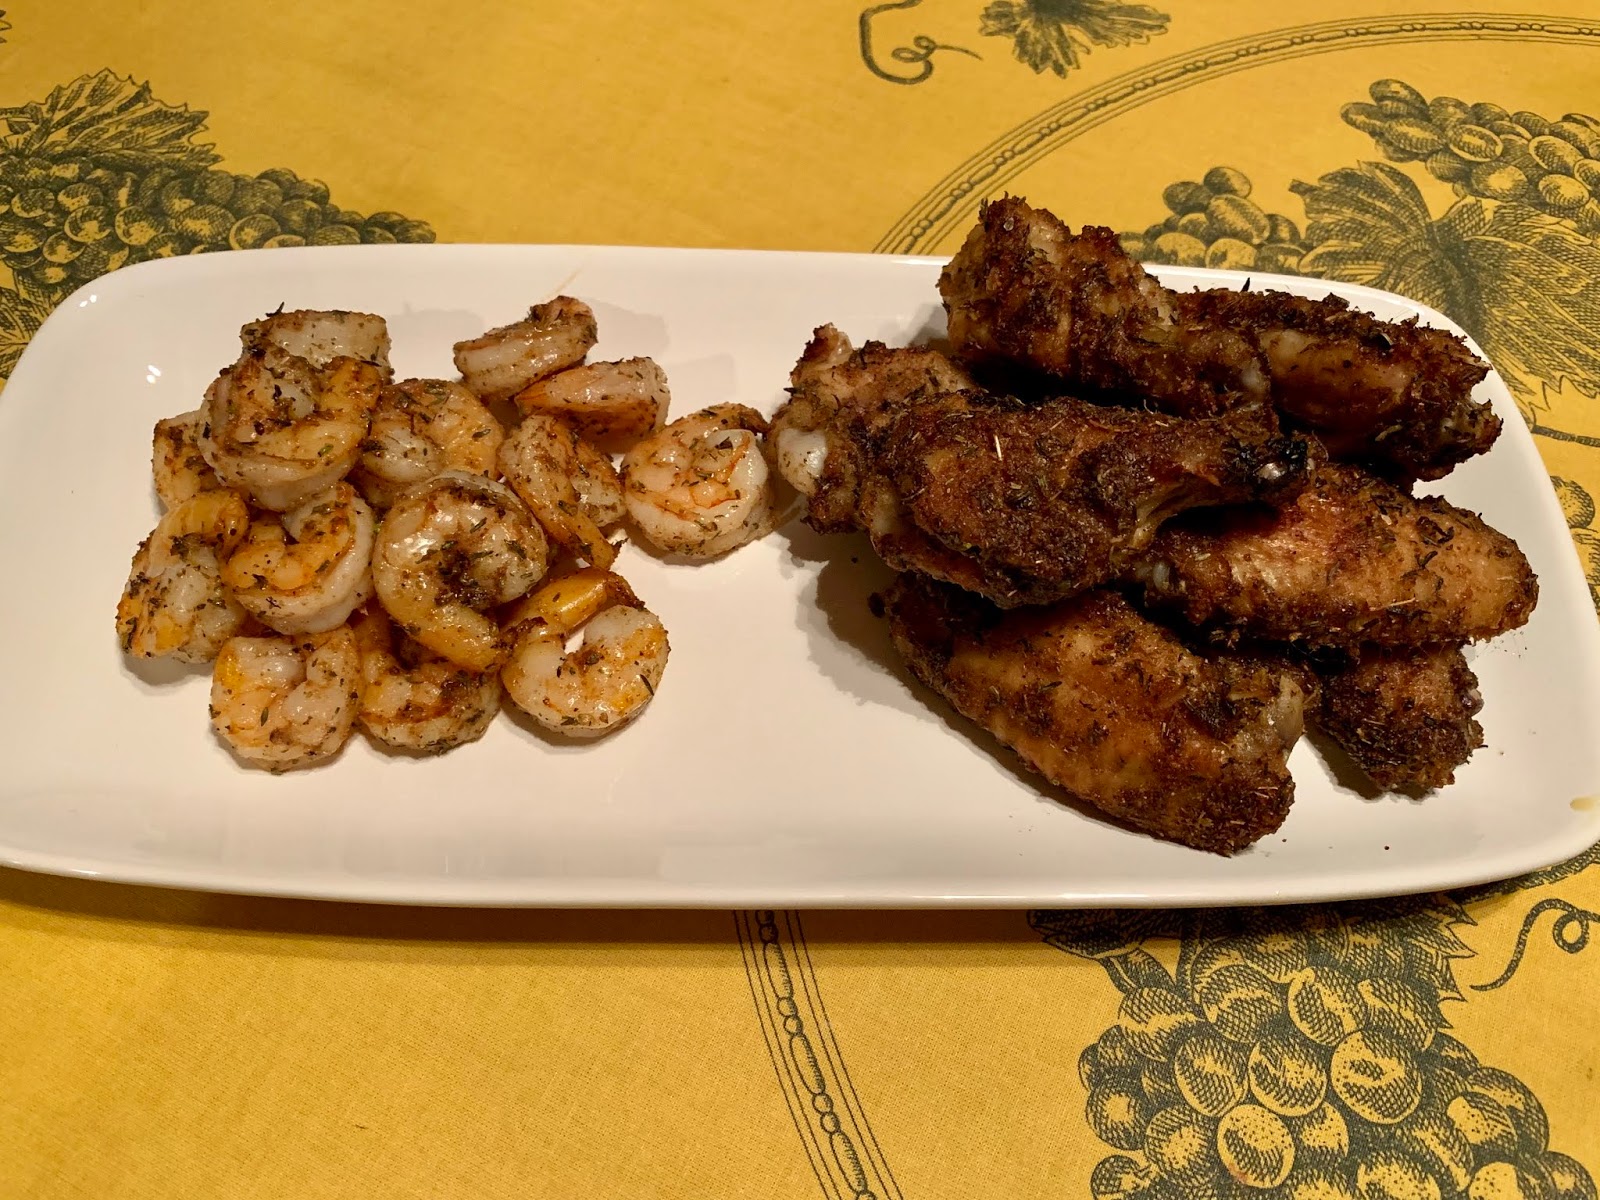
Third Time's a Charm! (Dry Rub Wings & Shrimp)

Tastiest wings and shrimp - pantry ingredients and
less time than takeout!
There have been times in my life when I thought we’d sprout feathers, we ate so much chicken. For the past couple of weeks, I thought we’d sprout wings.  

It all started with first 2019 post-season game for the Dodgers against the Nats...

...Flash back to last Sunday.... While doing my weekly swing thru Harris Teeter, I saw some great looking chicken wings in the poultry season so I snatched up the last package.  

The following night, after a full day at the home office, we needed something to eat as our beloved Dodgers faced the Nationals in what we hoped would be the first of many games leading to a World Series Win. Takeout seemed like such a copout. And then I remembered -- the wings!

With minutes to spare, I threw a bunch of herbs and spices in a bowl to make a dry rub. Then I splashed a glug of olive oil on the wings, let 'em rest a bit to allow the flavors to develop and roasted those babies in a 400 degree oven.  Wowzier! They were great! And the Dodgers won! So of course, being the superstitious Dodger Fans that we are, we had to have the exact same dinner the next night for the next game.

Tuesday rolled around. Another long day at the home office.  Another game. Steve dashed off to the Teeter for more wings. Back to the kitchen…. and this time I wrote down what I did. But I also changed the recipe up a tad and, darn it, they were a bit off. The Dodgers lost that night, and eventually were eliminated by the Nationals, but I’m not taking the blame.

Now I was determined. The Dodgers may have gone fishing for the year, but not me.

So last night, for yet another game (sans Dodgers). I whipped up my third batch. Less salt. Less cumin (the first time I've ever uttered those words). More rosemary. I also thawed and cleaned some shrimp to see how my concoction works with a different protein.

Bingo!

Both the wings and the shrimp were absolutely delish and deemed blog-worthy.

So here you are…. the ingredients and the method. The measurements in the recipe below made enough for 10-12 wing halves, a couple of handfuls of small/medium size shrimp, plus leftovers that really livened up our eggs this morning and a bit more that will probably be sprinkled on roasted cauliflower tonight.  I'm sure you can make more or even less (why?), just keep the proportions the same. Store leftovers in an air-tight container.
Enjoy!


Dry Rub Wings (& Shrimp)

Dry Rub Ingredients
  • 1 ½ tsp granulated garlic 
  • 1 ½ tsp dried thyme
  • 1 tsp kosher salt
  • 1 tsp smoked paprika
  • 1 tsp dried oregano
  • 1/2 tsp ground cumin
  • 1 tsp ground coriander
  • 1 1/2 tsp finely chopped fresh rosemary
  • 20 grinds black pepper
  • Olive oil to coat 
  • Protein of your choice: chicken wings and/or shrimp 

Method
Preheat oven to 400 degrees
Place a rack on a foil-lined baking sheet and spray it down with cooking spray
  • Mix the dry rub ingredients in a small bowl set aside
  • Pat the wings (and/or shrimp) dry with towels to remove any moisture and then toss them with a few tablespoons of olive oil in a large bowl. If you are doing both chicken and shrimp, do this in separate bowls. Then toss everybody with enough of the dry rub to coat. I do this in stages, sprinkling the rub on a little at a time and stirring gently to make sure they are evenly coated.
  • Arrange the wings/shrimp on separate prepared baking sheets and set them aside to rest for about 10-15 minutes to help the flavors develop.
  • For the chicken:  Slide the trays into the oven and roast for 25 minutes. Remove, flip each one over and then return to the oven for another 20 minutes. Remove from the oven and let rest on the wire rack for 10 minutes
  • For the shrimp: roast at the same temperature but for only 8-10 minutes, depending upon the size of the shrimp. When doing both wings and shrimp, do this while the wings are resting. The shrimp can be served right out of the oven.
  • Enjoy with celery sticks, sliced cucumbers, sliced red bell peppers and plenty of good quality or homemade bleu cheese dressing (we like Marie’s from the refrigerated section in the product department at most grocery stores). I also made a pesto dipping sauce by combining some pesto I froze during the summer with some mayo and lemon juice, which was amazing with the shrimp.

I bet you have all these ingredients
in your pantry!
Patience... wait a few minutes
before roasting for max flavor


Sunday, June 30, 2019

It's Haaaat (Summertime Shrimp & Avocado Lettuce Cups)


Cool and refreshing.... summer captured in a lettuce cup!
It is officially summer. And whenever the tempreatures rise like this, I have to think of the Seinfeild episode what Elaine and Jerry spend the night at Jerry's parents' condo in Florida. If you don't remember it, search for the episode titled, The Pen, and prepare to laugh. But I digress......

The temps are in the 90s now and the humidity is starting to catch up as well. I'm continually surprised at how we've adapted, but as the days get hotter and more humid, a cold dinner can be just the ticket. That’s where this dish comes in. 

I made this today so I could photograph it for the August issue of Southerly. Steve just walked in -- haaaat off the golf course -- and took a taste. Big thumbs up.

So as the temps rise, I hope you give this a try.  

Granted, you have to turn the oven on to roast the shrimp, but the results are so succulent that you’ll get over it!

Ingredients
1 lb. shrimp, (I like 16-20 size), peeled and deveined 
1 clove garlic, finely minced
2 TBS olive oil
2 ripe avocados, cut into large chunks
1/2 red bell pepper,  medium sized dice (save the other half for snacking)
1/2 orange bell pepper, medium sized dice (same as above)
3/4 cup English cucumber (the long ones sold in plastic that you don’t have to peel), medium dice
1/2 cup sweet onion, small dice
1/2 cup whole cilantro leaves
1 TBS finely chopped cilantro leaves
1/4 cup lime juice (typically 1 large lime if it’s juicy) + the zest from one lime
1/4 tsp ground coriander
Kosher salt and fresh cracked black pepper
1 head bib lettuce, washed, dried and divided into individual leaves. (You can also use iceberg lettuce, prepping it in a similar manner.)

Method:
  • Preheat the oven to 400 degrees and line a baking sheet with parchment. )You can use foil, but I prefer parchment.)
  • Toss the shrimp, garlic, olive oil, 1/2 tsp kosher salt and 10 grinds of black pepper in a medium sized bowl and then tip it all out onto the lined baking sheet. Pop this in the oven and set a timer for 8 minutes. Check them when the timer goes off - if they don’t look done, set the timer for another 2 minutes and you should be good to go.  You don’t want overcooked shrimp! 
  • When the shrimp are done, pull the pan from the oven and let it cool for about 5 minutes. Then pull up the paper on two sides and pour the shrimp and their juices into a glass bowl. Put this into the ‘fridge until chilled (about 15 - 20 minutes)
  • While the shrimp is chilling, gently (don’t smush the avocado!) combine the bell pepper, cucumber, onion, cilantro, lime juice, coriander, 1 tsp kosher salt and 10 grinds of black pepper in a large glass bowl. Then add the chilled shrimp to the mixture, stir to combine. Cover with plastic wrap and chill until ready to serve. 
  • To serve, let everyone spoon the mixture into lettuce leaves and eat as you would a taco. (Or skip that whole process and enjoy it as a side salad.)


Enjoy.

Saturday, November 10, 2018

New Years Resolutions in November (Cast Iron Roasted Salmon with Dill Yogurt Sauce)

A little over a year ago, I was asked to contribute monthly recipe for Southerly, a community magazine for the neighborhoods in the Croasdaile area of Durham, NC. It’s a sweet little magazine, with stories about local families and businesses and a recipe from yours truly. It’s been a fun addition to my recipe writing hobby, and I’ve learned quite a bit in the process. 

Perfectly crispy on the outside and moist on the inside
It may be November, but our January deadline is looming. So today, I put pen to paper and did a measurement test and photo session (i.e. open the shutters and pray for good light - photographing food is REALLY difficult!) of one of our favorite weekday dishes, oven roasted salmon in a cast iron skillet. I gussied it up a tad with a yogurt dill sauce. Perfect for our readers who want to stay true to their New Years resolutions, come 2019.

The best part of this little project was the tasting - this salmon is so moist, the skin so crispy and the dill sauce is down right relish. I can't wait to finish this blog post so I can enjoy the rest of it!

Here’s how you do it:

Cast Iron Skillet Salmon with Yogurt Dill Sauce

Ingredients:
For the fish
  • 1 salmon portion for each person to be served - get the thick rosy pink salmon portions from Trader Joes or Whole Foods (not the thin dark orangey red ones)
  • Olive oil (to coat both sides of each portion)
  • Kosher salt (a good pinch per portion)
  • Fresh cracked black pepper (about 6 grinds per portion)

Yogurt Dill Sauce 
  • 1 6 oz container of fat free strained plain Greek yogurt
  • The zest and juice of a lemon
  • 1TBS finely chopped fresh dill
  • 1/8 tsp Kosher salt
  • 1/8 tsp onion powder
  • 10 grinds of black pepper


Method:

  • Put a cast iron skillet large enough to fit the fish without crowding into a cold oven. Set the even to 450 degrees and turn it on. 
  • As the oven and skillet come up to temp, blot the fish dry with a paper towel and drizzle both sides with olive oil. Smear the oil around a tad and sprinkle the flesh side with a good pinch of salt and about 6 grinds of black pepper.
  • Also use this time to whisk all of the ingredients for the yogurt dill sauce together in a small bowl and set it aside.
  • When the oven comes to temp, put on two kitchen mitts and CAREFULLY take the skillet out and place it on the stove, with the gas burner* set to a medium high heat. Place the fish in the skillet, flesh side down. Set a timer for 4 minutes and let the fish sear. Do not touch or move it. Trust me, it won’t stick or burn. 
  • At the end of four minutes, use a metal spatula flip the fish so it’s skin side down and put the skillet back into the oven. Set the timer for 5 minutes.  (Note:  I wear a kitchen mitt on one left hand and hold the spatula in the other, to make sure I don’t touch the hot pan when turning the fish, and then put both mitts on to put the skillet in the oven)
  • AT the end of 5 minutes, put those mitts back on and remove the skillet from the oven. Immediately move the fish to serving plates so it won’t continue to cook in the hot pan.
  • Serve with the dill sauce and enjoy!
*This recipe has only been tested using a gas stove. Consult the manufacturer of your electric cooktop before placing a hot skillet on the glass surface, to ensure that it does not crack.

Friday, March 6, 2015

Happy to be Home (Oven Roasted Lemon/Herb Salmon & Asparagus – 5WW PPV)


Roasted Salmon and Asparagus.
Clean eating at its best.

The past two weeks have been a whirlwind of airports, convention centers and meetings that were preceded by months of preparation and an intense push to the finish line. First Las Vegas. Then Barcelona. The yin and yang of convention venues. 

While I thrive on this kind of work, nothing feels better than coming home and getting back to normal. After arriving home in the wee hours of the morning, I took a mental (and physical) health day. It was wonderful to sleep in, unpack, check in with the dry cleaners and make a much needed run to Whole Foods for fish, and Harris Teeter for basic pantry and fridge supplies.  Among my purchases: the salmon and asparagus that became the perfect dinner to chase away that yicky feeling that comes from too many restaurant meals.

Barcelona was beautiful
and our meetings were successful
but there is no place like home.
Steve and a buddy escaped the cold weather for a little Florida Baseball Spring Training and golf, so I’m a solo act and hence the single dinner portion.  However, you can easily multiply the quantities to feed as many folks as you need to feed.  

As always, I encourage playing around with the herbs and other flavors – in fact, I think I’m going to do a riff on this with sea bass, cilantro, jalapeño, orange and lime tomorrow. 


Oven Roasted Lemon/Herb Salmon & Asparagus (5 WW PPV)
(Serves 1, double, triple or quadruple as needed)

Ingredients:
  • 1 salmon filet, skin on if possible (4 oz = 5 WW PPV if that matters to you)  (I’ve said it a million times – if you are buying fish, buy the very best and freshest fish you can.  For me, that means Whole Foods or a local fish monger. Yes, you will pay a bit more.  If you are watching your pennies, enjoy a smaller portion, but make it the best.  Sermon over.)
  • 1 TBS Lemon Juice
  • 1 TBS Lemon Zest
  • 2 or 3 shakes garlic powder
  • 1 tsp or so of dried oregano
  • 1 ½ tsp or so of dried thyme
  • 1 TBS of fresh parsley, chopped
  • 1 tsp maple syrup
  • Kosher Salt and Fresh Cracked Pepper
  • 6 to 8 stalks of Asparagus, woody end trimmed off
  • Cooking Spray

Method:
  • Heat the oven to 400 degrees
  • Line a cooking sheet with aluminum foil and spray it with cooking spray
  • Place the fish (skin side down) and the asparagus on the tray – season liberally with salt and pepper and spray lightly with the cooking spray
  • Place the tray in the oven and cook for 13 minutes
  • While the fish is cooking, mix the rest of the ingredients in a small bowl, stirring well to soften the dried herbs
  • When the timer dings @ 13 minutes, remove the fish and asparagus from the oven and top the fish with the herb lemon mixture
  • Return the fish and asparagus to the oven and continue cooking another 3 to 5 minutes, depending upon the thickness of the fish – touch it to test for doneness, you want it to just give to a light pressure and not be too soft – but equally important, you don’t want it to be hard.  (Nothing is worse than over cooked fish!)
  • When the fish is done,  place the asparagus on a plate and then gently slide a spatula between the skin and the flesh, laying the fish atop the asparagus to serve. 


Enjoy!


Sunday, February 9, 2014

Tilapia with Roasted Butternut Squash, Tomatoes and Spinach (8 WW Points Plus Value)


Packed with "Power Foods"
this dinner is filling and
as healthy as it gets.
I’ve been on a roasted butternut squash kick.  Cut into bite sized pieces, drizzled with olive oil, and sprinkled with salt, pepper and whatever herb or spice floats your boat and butternut squash is a filling, figure friendly side dish or main event.  Yup, in my book these babies are crave-worthy.

Tonight I was also craving fish.  The two came together for a cozy winter dinner that pretty much cooked itself while we watched the Olympics. 


Tilapia with Roasted Butternut Squash, Tomatoes and Spinach
Serves 2 (8 WW Points Plus Value per serving)

Ingredients
  • 2 pieces of tilapia – boneless, skinless filets  or “loins” (who knew fish had loins!?!)
  • 1 1/2 cups butternut squash, peeled and cut into bite sized pieces (or buy it prepped at the store)
  • ½ cups cherry tomatoes
  • ¼  of a large sweet onion, cut into ¼ inch slices
  • A big handful of baby spinach
  • 1 tsp olive oil for the fish, and 1 TBS olive oil for the veggies
  • Kosher Salt
  • Cracked black pepper
  • Herbs d’ Provence (or whatever herb or herb blend you like)
  • Juice half a lemon
  • Tablespoon of capers (optional, but I love the briny punch they add and always have a jar on hand.  Try them in tuna salad!)


Method

The Veggies
  • Heat oven to 375 degrees
  • Cover a baking sheet with foil and scatter the squash, tomatoes and onions in a single layer
  • Drizzle with olive oil, sprinkle with salt, pepper and Herbs d’ Provence; and toss gently.  Then spread the mixture out to a single layer
  • Put into the oven and roast for 30 minutes, stirring once or twice for even cooking
  • At the 30 minute mark, pull the sheet out.  The squash should be soft and the tomatoes deflating.  Add the spinach and stir again
  • Replace in the oven and roast for another 15 minutes
  • At the end of 15 minutes, pull from the oven and pull the foil up and around the veggies like a pouch to steam further.


The Fish
  • Sprinkle each side of the fish with salt and pepper
  • Heat a non-stick sauté pan and drizzle with about a teaspoon of olive oil. 
  • When the pan is hot enough for the fish to sizzle when it touches the pan, add the fish and sauté  on one side for 2 minutes; then flip the fish, squeeze on the lemon juice and add the capers and cook for another 2 minutes or until the fish is firm to the touch.


To serve – spoon half of the veggie mixture onto a plate or pasta bowl and top with a fish filet. 

Enjoy!