Showing posts with label Appetizers. Show all posts

Saturday, October 12, 2019

Third Time's a Charm! (Dry Rub Wings & Shrimp)

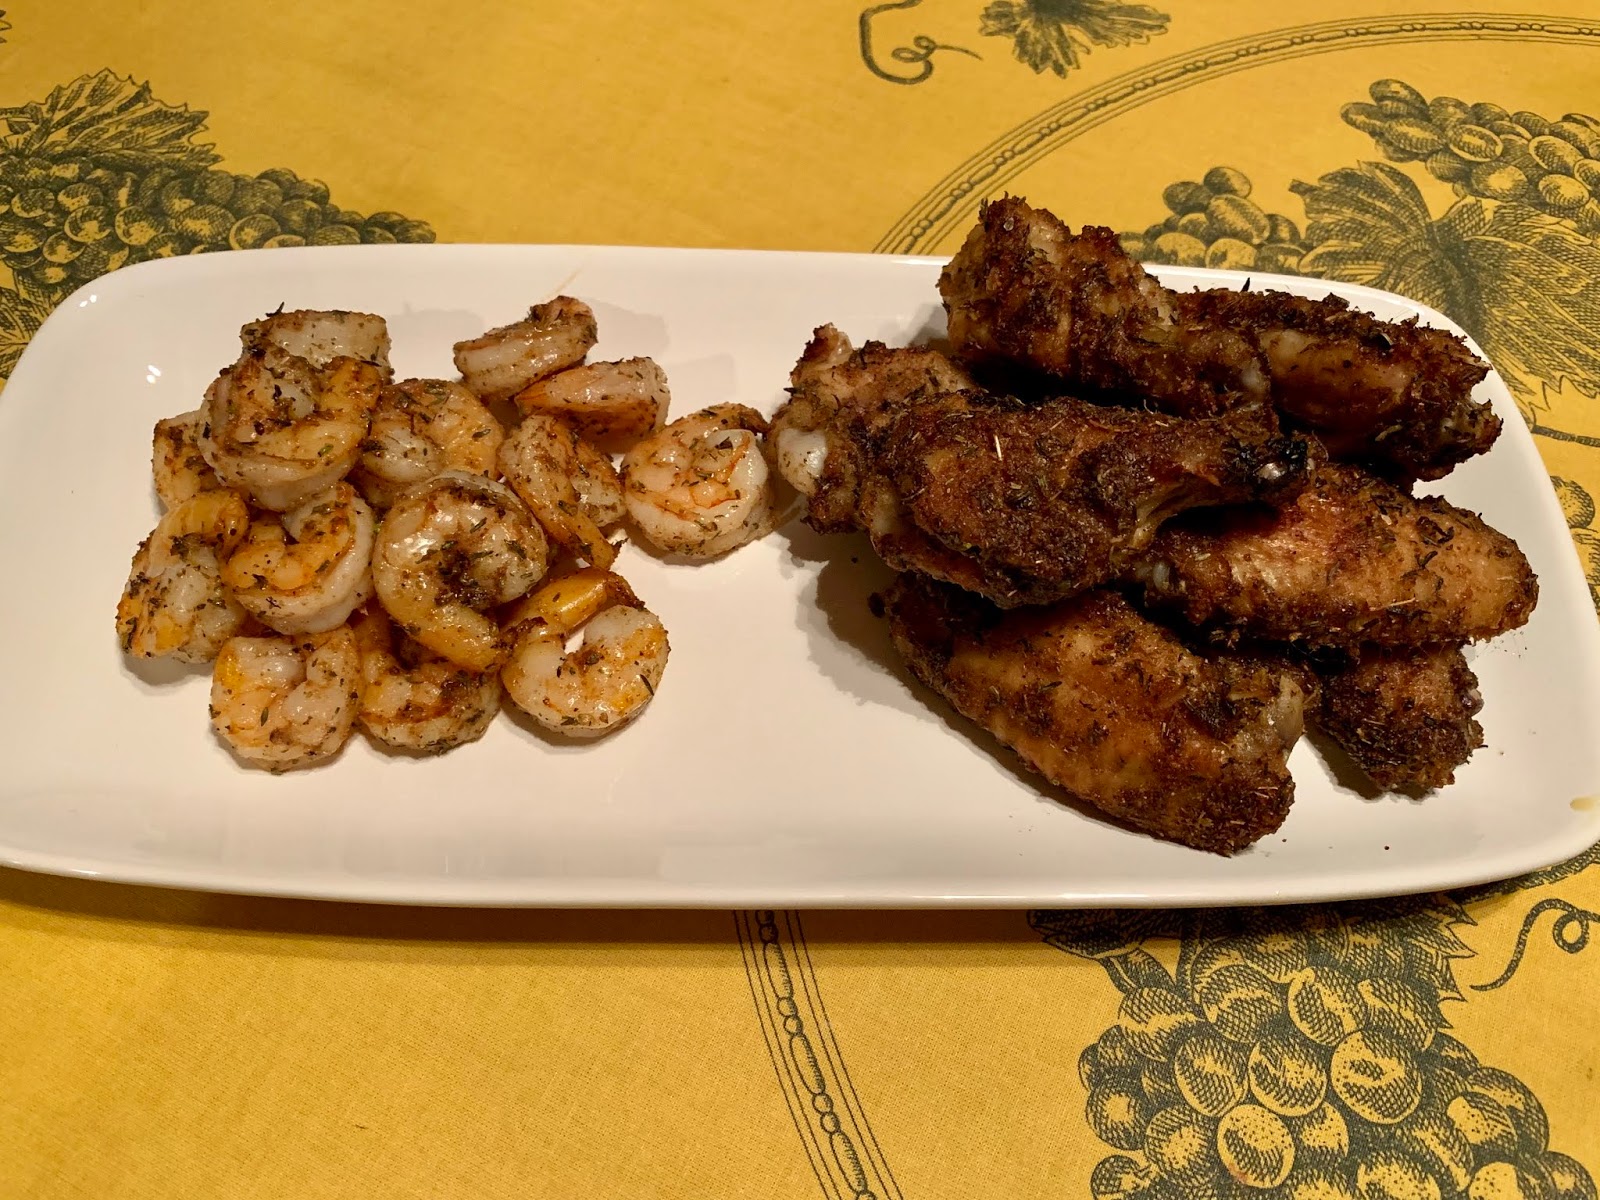
Tastiest wings and shrimp - pantry ingredients and
less time than takeout!
There have been times in my life when I thought we’d sprout feathers, we ate so much chicken. For the past couple of weeks, I thought we’d sprout wings.  

It all started with first 2019 post-season game for the Dodgers against the Nats...

...Flash back to last Sunday.... While doing my weekly swing thru Harris Teeter, I saw some great looking chicken wings in the poultry season so I snatched up the last package.  

The following night, after a full day at the home office, we needed something to eat as our beloved Dodgers faced the Nationals in what we hoped would be the first of many games leading to a World Series Win. Takeout seemed like such a copout. And then I remembered -- the wings!

With minutes to spare, I threw a bunch of herbs and spices in a bowl to make a dry rub. Then I splashed a glug of olive oil on the wings, let 'em rest a bit to allow the flavors to develop and roasted those babies in a 400 degree oven.  Wowzier! They were great! And the Dodgers won! So of course, being the superstitious Dodger Fans that we are, we had to have the exact same dinner the next night for the next game.

Tuesday rolled around. Another long day at the home office.  Another game. Steve dashed off to the Teeter for more wings. Back to the kitchen…. and this time I wrote down what I did. But I also changed the recipe up a tad and, darn it, they were a bit off. The Dodgers lost that night, and eventually were eliminated by the Nationals, but I’m not taking the blame.

Now I was determined. The Dodgers may have gone fishing for the year, but not me.

So last night, for yet another game (sans Dodgers). I whipped up my third batch. Less salt. Less cumin (the first time I've ever uttered those words). More rosemary. I also thawed and cleaned some shrimp to see how my concoction works with a different protein.

Bingo!

Both the wings and the shrimp were absolutely delish and deemed blog-worthy.

So here you are…. the ingredients and the method. The measurements in the recipe below made enough for 10-12 wing halves, a couple of handfuls of small/medium size shrimp, plus leftovers that really livened up our eggs this morning and a bit more that will probably be sprinkled on roasted cauliflower tonight.  I'm sure you can make more or even less (why?), just keep the proportions the same. Store leftovers in an air-tight container.
Enjoy!


Dry Rub Wings (& Shrimp)

Dry Rub Ingredients
  • 1 ½ tsp granulated garlic 
  • 1 ½ tsp dried thyme
  • 1 tsp kosher salt
  • 1 tsp smoked paprika
  • 1 tsp dried oregano
  • 1/2 tsp ground cumin
  • 1 tsp ground coriander
  • 1 1/2 tsp finely chopped fresh rosemary
  • 20 grinds black pepper
  • Olive oil to coat 
  • Protein of your choice: chicken wings and/or shrimp 

Method
Preheat oven to 400 degrees
Place a rack on a foil-lined baking sheet and spray it down with cooking spray
  • Mix the dry rub ingredients in a small bowl set aside
  • Pat the wings (and/or shrimp) dry with towels to remove any moisture and then toss them with a few tablespoons of olive oil in a large bowl. If you are doing both chicken and shrimp, do this in separate bowls. Then toss everybody with enough of the dry rub to coat. I do this in stages, sprinkling the rub on a little at a time and stirring gently to make sure they are evenly coated.
  • Arrange the wings/shrimp on separate prepared baking sheets and set them aside to rest for about 10-15 minutes to help the flavors develop.
  • For the chicken:  Slide the trays into the oven and roast for 25 minutes. Remove, flip each one over and then return to the oven for another 20 minutes. Remove from the oven and let rest on the wire rack for 10 minutes
  • For the shrimp: roast at the same temperature but for only 8-10 minutes, depending upon the size of the shrimp. When doing both wings and shrimp, do this while the wings are resting. The shrimp can be served right out of the oven.
  • Enjoy with celery sticks, sliced cucumbers, sliced red bell peppers and plenty of good quality or homemade bleu cheese dressing (we like Marie’s from the refrigerated section in the product department at most grocery stores). I also made a pesto dipping sauce by combining some pesto I froze during the summer with some mayo and lemon juice, which was amazing with the shrimp.

I bet you have all these ingredients
in your pantry!
Patience... wait a few minutes
before roasting for max flavor


Sunday, July 21, 2019

Crowd Pleaser (Cilantro-Lime Pepita Dressing/Dip)


We got together with friends last night for a fantastic dinner of InstantPot  pork tacos (cooked with plums and peppers - it was amazing!), great wine and conversation that ranged the gamut from belly laughs to solving the problems of the universe. So much fun.


Ready for dipping...
When I was asked to bring an app, my mind immediately went to a crisp and cool (it's freaking hot here) veggie platter. First I thought bleu cheese dip. Then I thought yogurt ranch. And then - boom!- I thought about my very favorite dressing recipe that I created way back when we lived in Brea, California. Cilantro-Lime-Pepita dressing that is reminiscent of the fantastic Mexican Caesar Salad served at the El Torito restaurant on the hill above the town, by Brea Olinda High School. 

While I often just throw this together, I wanted this batch to be just right. So, I searched the blog and couldn't find it. Thankfully I had a copy on my laptop from when I tested it for Southerly Magazine. 

So here it is, two ways - photographed as a dip and as a dressing with grilled shrimp and garnished with Cojita Cheese. (I used to put 1/8 of a cup of the cheese into the dressing, but lately I've been leaving it out and really like the light and press taste that results. Your call to leave it in or leave it out!
.... and as a salad with grilled shrimp and Cojita cheese

Here's how you can make it: 


Dressing/Dip Ingredients
(makes a little more than 1 cup, plenty for dipping with leftovers)
  • 1 large garlic clove, peeled
  • 1 7oz  Greek Yogurt (full-fat, 2%, 1% or 0% - it doesn't matter as long as it's Greek Yogurt - I use Fage brand)
  • 1 T mayonnaise
  • 1/8 cup cider vinegar
  • Juice and zest of one lime
  • 1/2 tsp kosher salt
  • ½ tsp ground black pepper
  • 1 bunch cilantro, washed, dried and stems removed (just twist ‘em off; no need to get crazy about removing every little stem)
  • 1/8 cup pepitas (Mexican pumpkin seeds, found in the nut section)
  • 1/8 cup queso fresco (Mexican cheese that you can crumble, available at most grocery stores), plus the same amount for garnish.

Dressing Directions:
In the food processor with steel blade:

  • Blitz all of the ingredients except the cilantro until smooth
  • Then add the cilantro and pulse until cilantro is finely chopped and incorporated into the mixture
  • Check the seasoning and add more salt to taste if needed.

Sunday, June 30, 2019

It's Haaaat (Summertime Shrimp & Avocado Lettuce Cups)


Cool and refreshing.... summer captured in a lettuce cup!
It is officially summer. And whenever the tempreatures rise like this, I have to think of the Seinfeild episode what Elaine and Jerry spend the night at Jerry's parents' condo in Florida. If you don't remember it, search for the episode titled, The Pen, and prepare to laugh. But I digress......

The temps are in the 90s now and the humidity is starting to catch up as well. I'm continually surprised at how we've adapted, but as the days get hotter and more humid, a cold dinner can be just the ticket. That’s where this dish comes in. 

I made this today so I could photograph it for the August issue of Southerly. Steve just walked in -- haaaat off the golf course -- and took a taste. Big thumbs up.

So as the temps rise, I hope you give this a try.  

Granted, you have to turn the oven on to roast the shrimp, but the results are so succulent that you’ll get over it!

Ingredients
1 lb. shrimp, (I like 16-20 size), peeled and deveined 
1 clove garlic, finely minced
2 TBS olive oil
2 ripe avocados, cut into large chunks
1/2 red bell pepper,  medium sized dice (save the other half for snacking)
1/2 orange bell pepper, medium sized dice (same as above)
3/4 cup English cucumber (the long ones sold in plastic that you don’t have to peel), medium dice
1/2 cup sweet onion, small dice
1/2 cup whole cilantro leaves
1 TBS finely chopped cilantro leaves
1/4 cup lime juice (typically 1 large lime if it’s juicy) + the zest from one lime
1/4 tsp ground coriander
Kosher salt and fresh cracked black pepper
1 head bib lettuce, washed, dried and divided into individual leaves. (You can also use iceberg lettuce, prepping it in a similar manner.)

Method:
  • Preheat the oven to 400 degrees and line a baking sheet with parchment. )You can use foil, but I prefer parchment.)
  • Toss the shrimp, garlic, olive oil, 1/2 tsp kosher salt and 10 grinds of black pepper in a medium sized bowl and then tip it all out onto the lined baking sheet. Pop this in the oven and set a timer for 8 minutes. Check them when the timer goes off - if they don’t look done, set the timer for another 2 minutes and you should be good to go.  You don’t want overcooked shrimp! 
  • When the shrimp are done, pull the pan from the oven and let it cool for about 5 minutes. Then pull up the paper on two sides and pour the shrimp and their juices into a glass bowl. Put this into the ‘fridge until chilled (about 15 - 20 minutes)
  • While the shrimp is chilling, gently (don’t smush the avocado!) combine the bell pepper, cucumber, onion, cilantro, lime juice, coriander, 1 tsp kosher salt and 10 grinds of black pepper in a large glass bowl. Then add the chilled shrimp to the mixture, stir to combine. Cover with plastic wrap and chill until ready to serve. 
  • To serve, let everyone spoon the mixture into lettuce leaves and eat as you would a taco. (Or skip that whole process and enjoy it as a side salad.)


Enjoy.

Monday, July 30, 2018

Y'all Come! (Carolina Taquitos with SoCal Slaw)

Carolina Taquitos with SoCal Slaw 
Makes 12 taquitos - 4 entrée servings or appetizers for 6-8 people

We love having folks come to visit. Full stop. It’s like combining the best of two worlds - our wonderful area here in Durham, with friends and family from SoCal, work friends from around the world, our son (who now lives in Florida). You name it. We’ll take it. We love having company.
A taste of home - both SoCal and North Carolina

With this as a backdrop, you’ll understand how happy we were when our SoCal friend Sheryl (and my BFF from Cal State Fullerton) decided to come for a long weekend. This was her fourth trip in the nine years (!) we’ve live here, so she already knows the drill. But as Durham continues to evolve, we continue to have new places to go, areas to explore. It’s a blast.

Her arrival also gave me an excuse to try out a recipe I’ve been writing, which transforms the vinegary and slightly sweet and spicy pork barbecue that is common here into crispy crunch taquitos like the ones we loved in SoCal, served up with a refreshing lime and cilantro coleslaw and guacamole. Oh yeah.

We made the dish last night. It earned a Steve Barnett “Home Run, Honey!” In fact, he said it might just be a grand slam! So here it is for you.  

Here's how you do it.

For the taquitos
12 corn tortillas (try to get fresh corn tortillas from a Mexican market, but packaged tortillas from the store will do.
1 pound of barbecue pulled pork (we get this from the barbecue place up the road) 
1/2 cup Carolina vinegar-based barbecue sauce (if your pork comes unseasoned with sauce)
Corn oil to fill a skillet to 3/4 of an inch
toothpicks for securing the taquitos while frying (2 per taquito)

Garnishes - take your pick, or do them all:
Guacamole - fresh or pre-made (for a quick guac, mash a ripe avocado with the juice of 1/2 a lime, about a TBS each of diced onion, and cilantro, plus a good pinch of salt and a bit of your favorite hot sauce or salsa)
Sour cream
Mexican queso fresco (dry white cheese that crumbles well) or shredded cheddar cheese f

Method:
  • Break up the barbecue into thin bite sized pieces and mix in the sauce. Set aside
  • For each taquito, 
  • Warm a tortilla for about 10-seconds per side over a gas flame or dry frying pan to make them pliable and easy to roll. 
  • Put about 2 TBS of the barbecue mixture on a tortilla, towards one side. Then working from that side, roll the tortilla over the barbecue like a cigar. Push two toothpicks through to secure, leaving long on one side.This will come in handy when frying.
  • To fry, heat the oil in a heavy skillet until a piece of a tortilla that is placed in the oil begins to bubble. Then use tongs to carefully place 3 taquitos in the oil, seam side down and long end of the toothpick up, into the oil. Fry until golden brown (about 45 seconds) then pull out the toothpicks and flip to fry the other side until done (about 30 seconds). Remove to drain on paper towels. 
  • Serve with a small pile of the slaw and garnishes of your choice.


For the slaw
1/4 cup sweet onion, quarter-inch diced
1/3 cup mayonnaise
1 lime, juiced (about 2 TBS)
1 1/2 TBS jalepeno, seeded and diced
1/4 tsp kosher salt
15 grinds black pepper
1/4 level tsp coriander 
1/4 level tsp cumin
1 14 oz bag of tricolor coleslaw mix (red and green cabbage with carrots - no dressing)
2/3 cup cilantro, finely chopped

Method
  • Mixture first eight ingredients in a large bowl until well combined. 
  • Add the bag of cabbage/carrot slaw mix and the cilantro
  • Stir well and chill at least 30 minutes

Enjoy.

Sunday, July 9, 2017

Summertime Summertime (BLT Crostini and Summer Squash Crostini)

Ready for the dinner party: two summertime apps inspired
by two of our favorite local haunts, Merrit's and Picnic
Summer in North Carolina means two things:   Bacon Lettuce & Tomato sandwiches and Barbecue. So when I was asked to bring a appetizer to a Saturday evening dinner party this weekend, I decided to create a couple of crostini recipes using inspiration from two of our favorite local recipes — Merrit’s in Chapel Hill, home of the a simple and straightforward BLT that defines that iconic summertime sammy; and Picnic, an up and coming Durham BBQ restaurant that is co-owned by a local heritage pig farmer and raising the bar for succulent whole hog Q.

The Merrit’s BLT rift was pretty simple. Crusty bread, a touch of mayo, and bright red juicy tomato slices topped with crisp applewood smoked bacon and shredded lettuce.  I jazzed the mayo up a tad by adding chives from the garden and a touch of garlic, salt and pepper. The beauty of a Merrit’s BLT is its simplicity, no need to guild that lily too much.

The Picnic influenced crostini was a bit more of a challenge. I didn’t want go the smoked and pulled piggy route.  Way too filling for a pre-dinner app. Instead, I took inspiration from a refreshing squash side salad you often find on the Picnic menu when the prolific veggies are in season.

BLT Crostini
Following are the ingredients and methods for these tasty treats.  I hope they inspire you to come up your own new favorite start to a summertime meal.

BLT Crostini
(makes 8 pieces, two per person)

Ingredients
  • 8, 1/2 inch slices of a crusty baguette.  (I used ciabatta baguette from Trader Joes)
  • 1/2 cup of Dukes or Best Foods Mayonnaise
  • 1 small clove of garlic, worked into a paste on a cutting board, with a bit of coarse salt and the side blade of a chef’s knife
  • 1 Tablespoon of finely chopped chives (optional)
  • 4 slices of thick sliced bacon (I used uncured applewood smoked bacon from Trader Joes), cooked crisp, blotted dry with a paper towel and broken into 1 inch pieces
  • 8 pieces of sliced tomato, about the same size as the bread, drained on a paper towel. Pick the best and brightest red tomatoes you can find. 
  • 1/2 cup of shredded romain lettuce - make it as thin as you can, and moisten slightly with a bit of oil and vinegar
  • Kosher salt and course ground pepper to taste
  • Olive oil spray, or a bit of olive oil and a brush


Method
  1. Spray or brush the bread slices with olive oil and grill on a grill pan until slightly crispy. 
  2. Mix the mayo, garlic and chives in a small bowl and set aside - it’s nice to do this a bit ahead of time so the flavors can come together 
  3. To assemble, use an offset spatula or butter knife to spread a bit of the mayo on each piece of bread, top with a slice of tomato, then dab two or three pieces of bacon with a dot of the mayo (like glue) and press them atop the tomato, then put a bit of the lettuce atop the bacon.
  4. Enjoy.

Summer Squash, Zucchini and Corn Crostini
(makes 8 pieces, two per person)
Summer Squash, Zucchini &
Fresh Corn Crostini

Ingredients:
  • 8, 1/2 inch slices of a crusty baguette.  (I used ciabatta baguette from Trader Joes)
  • 1/2 zucchini, sliced into ribbons, using a vegetable peeler
  • 1 large summer squash, sliced into ribbons using a vegetable peeler
  • 1/2 corn cob, kernels removed with a chef’s knife
  • 1 Tablespoon walnut oil (you could substitute another mild oil, like canola or grape seed)
  • 1 Tablespoon apple cider vinegar
  • 1 tablespoon finely chopped basil
  • 1 teaspoon finely chopped tarragon
  • 1/2 cup creamy goat cheese (I used a log of herbed goat cheese from Trader Joes)
  • 1 to 2 Tablespoons milk or half and half
  • 2 Tablespoons roasted, salted sunflower seeds
  • Kosher salt and course ground pepper to taste
  • Olive oil spray, or a bit of olive oil and a brush


Method
  1. Spray or brush the bread slices with olive oil and grill on a grill pan until slightly crispy. 
  2. Use a fork to mix the goat cheese and milk / half & half until smooth and spreadable. 
  3. Combine the squash ribbons, corn, oil, vinegar, basil, tarragon, salt and pepper in a small bowl and set aside. It’s nice to do this a bit early so the flavors can meld and the squash can soften
  4. To assemble, use an offset spatula or butter knife to spread a bit of the goat cheese on each piece of bread; then top each piece with a few kernel of corn, two to three squash ribbons and a sprinkle of sunflower seeds, salt and pepper.
  5. Enjoy.


Saturday, September 26, 2015

Rainy Girls Night In (Roasted Grapes with Rosemary, Thyme & Garlic)


One of my fondest memories from my friendship with my bestie Sheryl was an afternoon that we spent with our friend Julie at the Bower’s Museum in Santa Ana.  

It was supposed to be a cultural affair. We’d have a bite of lunch under the olive trees at the al fresco restaurant at the Bowers, then tour the museum --  which had some sort of mummy exhibit that was all the rage.  Maybe we’d hit the museum store afterward.  Who knows?
Done in 15 minutes and crazy good.
Pretty, too, on my grandmother's peacock plate.

Well.  Let’s just say we never made it to the museum. 

Nope.  Sheryl ordered a “wunnnndaful” Spanish Pinot Grigio, and as I recall we all spotted the roasted grapes and manchego cheese appetizer, and agreed that we had to have it.  A bottle or two later, we said to heck with the mummies, did some tipsy shopping in the museum store and called it an afternoon.

That day and that dish was my inspiration when my friend Norma stopped by this evening with a bottle of a yummy white.  Our men are in California for golf and a car race (playing and watching the former, and just watching the latter - thank you, Lord).  It’s been raining here all day – perfect chance to try my hand at roasting some grapes.

Oh yes.  They were as good as I remembered.  And this would be a perfect appetizer if you are having folks over.  I know it was the perfect light dinner for the two of us to catch up.

Here’s how you do it.

Roasted Grapes with Rosemary, Thyme & Garlic
Heat the oven to 375 degrees – I used my convection roast setting, but it’s not necessary

Ingredients
  • 1  big bunch of grapes, removed from the stems, washed and dried. We used a mixture of seedless red and green.  We preferred the red, but the green were awesome, too. 
  • 1 stem fresh rosemary
  • 1or two large stem fresh thyme
  • 1 clove of garlic
  • A couple glugs of olive oil - seriously, I don't know how much.  Just coat the grapes and be done with it. 
  • Big pinch of kosher salt
  • Bunch of grinds of pepper – I used a pepper mix I got in Barcelona last winter.  Red, black, green and even some allspice thrown in.  But plain black pepper would be just fine.

Optional:  
  • Cheese to serve with the grapes. I'd go with Manchego or other firm, mild cheese.  I didn’t have manchego, so I used a firm queso fresco (also sometimes called queso blanco).  A nice hard goat cheese – like Drunken Goat (you'll find it at Whole Foods and many cheese stores)– would be great too.
  • I'm sure crusty bread would be nice.  We started to have crackers and then decided that the grapes and cheese were perfect on their own.


Method
  • Remove the rosemary and thyme leaves from their stems, and peel the garlic.
  • Mince the rosemary, thyme and garlic to a very very fine dice. 
  • Toss all of the ingredients in a big bowl.
  • Scatter the grapes on a baking sheet, so they are in an even row.
  • Put in the oven. 
  • Set the timer for 15 minutes.
Open a bottle of nice, crisp white wine. Go ahead, have a sip.  Or two.
  •  After 15 minutes, check the grapes.  
  • They should be just about to pop, and some of them will shrink a tad.
  • Remove from the oven.  Let them cool a bit and then enjoy with cheese or as they are.


Yummmmmmmm


Friday, June 8, 2012


Party Time (Low Fat Herb Garden Dip)


Inspired by my herb garden and served up in a
Scottish Terrier bowl with a sprig of tarragon flowers
Nothing like a garden teeming with fragrant herbs to inspire a tasty appetizer, served up in a whimsical bowl and garnished with a sprig of tarragon flowers.  

This inspiration hit at just the right moment, since we are headed to a cocktail party this evening.  I think it will be a hit – and it is figure friendly, to boot!  I entered the ingredients into the Weight Watchers Points Plus Calculator and it told me that the entire recipe is 7 points and I figure it makes about 16 TBS so a 2 TBS serving is 1 Point!


Note:   
Use this as a guide – not an exact recipe.  I started mixing stuff up and it was so tasty I had to share. 


Low Fat Herb Garden Dip

  • 1 cup Fage Fat Free Greek Yogurt
  • 1 Tablespoon Mayonnaise
  • About 3 TBS of herbs from the garden – I used tarragon, dill, thyme, basil, and chives  --  chopped as fine as you can
  • 1 clove of garlic, boiled in water for about 3 – 5 minutes and then mashed into a paste (boiling the garic will give you the taste of garlic, without the sting of fresh.  A trick I learned at a cooking class at A Southern Season)
  • Juice of 3/4 of of a lemon
  • About ¼ teaspoon Beau Monde Seasoning.  Then add more to taste.
  • Salt and Pepper to taste


Mix it all up and put into a serving bowl for dipping veggies. 


Sunday, July 10, 2011

Back Porch Evenings - (Deviled Eggs Two Ways)

What a great weekend.  Steve's playing in a tournament at Croasdaile, I did my part to stimulate the local economy and had fun Saturday exploring historic Hillsborough, and last night we kicked off a series of  “back porch” evenings that bring folks from our neighborhood together for beverages,  appetizers and a really good time.

The makin's for great deviled eggs:
farm fresh eggs, savory flavorings,
and my electric egg cooker. 
My contribution seemed to go over well – deviled eggs two ways.  But then, I don’t think I’ve ever met a person (especially of the male persuasion) who does not enjoy a good deviled egg. 

The inspiration for yesterday’s batch was a trip to Blue Sky Oil and Vinegar, a cute little shop that just celebrated one year of business bringing the best quality olive oils, infused oils and balsamic vinegars to the Chapel Hill area.  Blue Sky has a great jalapeño white balsamic vinegar and I’d heard that it is good in deviled eggs.  Based on the comments and empty egg pate last night, I think I heard right.

Since everyone can’t get their hands on jalapeño vinegar, I’m also sharing my normal everyday deviled egg recipe.  I took this one to the party last night as well, and it also received good reviews.  It’s a bit more savory that most DE recipes, and features celery seed (NOT celery salt) as a key ingredient.  I hope you enjoy it as well.

Recipe #1 - Holly’s Basic Deviled Eggs:
Makes 12 pieces

Ingredients
  • 7 fresh eggs (I know, the recipe says it makes 12 and you are cooking 7 eggs.  Stick with me here)
  • 2 green onions – diced VERY fine
  • 1 ½ to 2 tsp apple cider vinegar (if you have small eggs opt for the lesser amount)
  • 1 ½ Tbs good mayonnaise (Helman’s, Best Foods – or if you are in the South, Dukes)
  • A good pinch of Kosher salt and 5 or 6 grinds of black pepper
  • 1 tsp celery seed (not celery salt)
  • 12 capers, for garnish (optional) – you can also dust with a little bit of paprika for a more traditional look.


Recipe #2 Holly’s Essence of Jalapeño Deviled Eggs

Ingredients:
  • Same as the basic ingredients, but substitute:
  • Blue Sky Jalapeño White Balsamic Vinegar rather than apple cider vinegar
  • 1 tsp finely chopped fresh seeded jalapeños for the celery seed
  • ¼ pickled jalapeños rather than capers for a first garnish
  • Add a very light dusting of chili powder as a second garnish


Method for either variety
Note About Cooking Eggs:  First off, if you don’t have an electric egg cooker  - buy one.  They are CHEAP and make perfect hard-boiled eggs without sticking. Worth the extra appliance.  My mother had one of these babies when we were growing up and I have had one since I move out on my own.  Frankly, I really don’t know how to boil an egg otherwise.
  • Hard boil and cool the eggs (drop them into a bowl of ice and cold water if you are in a hurry), slice them in half and separate the yolks into a bowl and set 12 of the 14 empties on a platter.  Toss the extra egg white, or feed it to the dog. The extra yolk will ensure that you don't have skimpy eggs.  
  • Using a fork, crumble the eggs into a fine texture
  • Add the rest of the ingredients and combine into a smooth mixture.  This may seem a bit drier than you are used to; but trust me – you really don’t want a gloppy egg. 
  • Taste and adjust seasoning, as you desire
  • Now using a teaspoon (or pastry bag, but that is just too much clean up for me) fill the egg whites
  • Add the garnish and chill until it’s time to serve

 Enjoy!