Showing posts with label Entertaining. Show all posts

Saturday, October 12, 2019

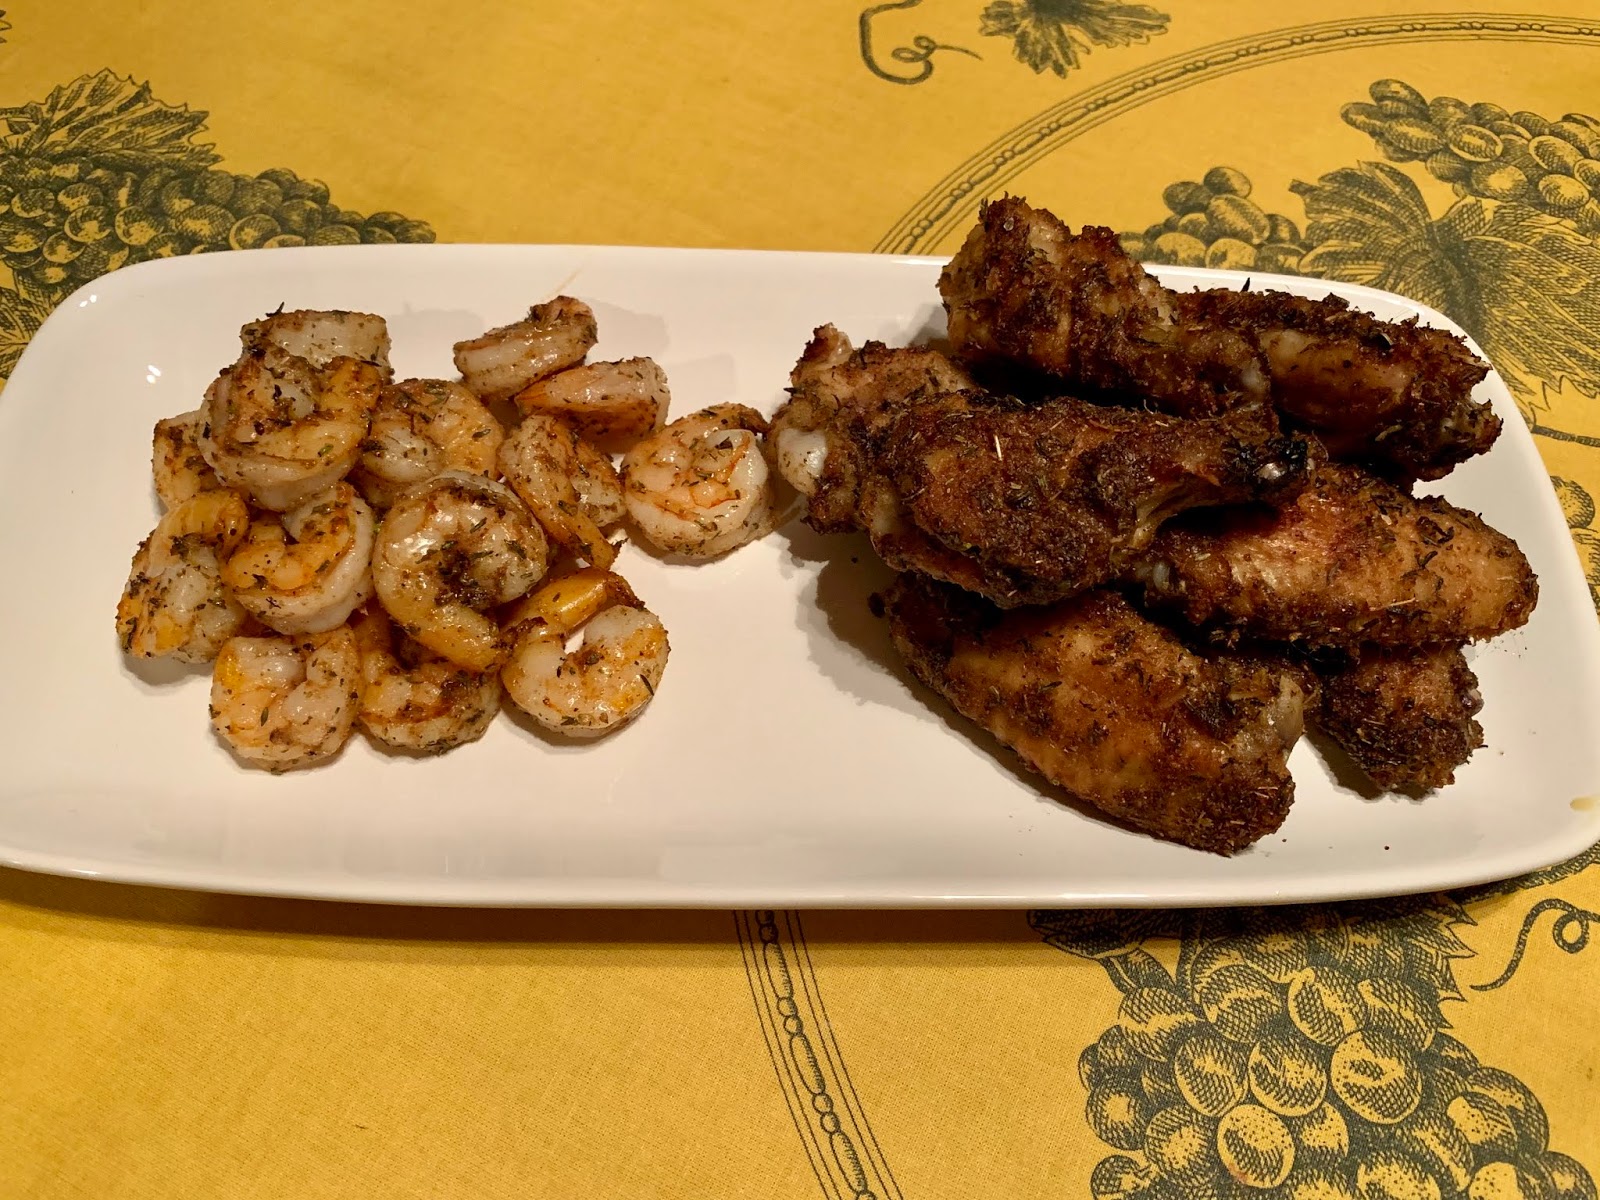
Third Time's a Charm! (Dry Rub Wings & Shrimp)

Tastiest wings and shrimp - pantry ingredients and
less time than takeout!
There have been times in my life when I thought we’d sprout feathers, we ate so much chicken. For the past couple of weeks, I thought we’d sprout wings.  

It all started with first 2019 post-season game for the Dodgers against the Nats...

...Flash back to last Sunday.... While doing my weekly swing thru Harris Teeter, I saw some great looking chicken wings in the poultry season so I snatched up the last package.  

The following night, after a full day at the home office, we needed something to eat as our beloved Dodgers faced the Nationals in what we hoped would be the first of many games leading to a World Series Win. Takeout seemed like such a copout. And then I remembered -- the wings!

With minutes to spare, I threw a bunch of herbs and spices in a bowl to make a dry rub. Then I splashed a glug of olive oil on the wings, let 'em rest a bit to allow the flavors to develop and roasted those babies in a 400 degree oven.  Wowzier! They were great! And the Dodgers won! So of course, being the superstitious Dodger Fans that we are, we had to have the exact same dinner the next night for the next game.

Tuesday rolled around. Another long day at the home office.  Another game. Steve dashed off to the Teeter for more wings. Back to the kitchen…. and this time I wrote down what I did. But I also changed the recipe up a tad and, darn it, they were a bit off. The Dodgers lost that night, and eventually were eliminated by the Nationals, but I’m not taking the blame.

Now I was determined. The Dodgers may have gone fishing for the year, but not me.

So last night, for yet another game (sans Dodgers). I whipped up my third batch. Less salt. Less cumin (the first time I've ever uttered those words). More rosemary. I also thawed and cleaned some shrimp to see how my concoction works with a different protein.

Bingo!

Both the wings and the shrimp were absolutely delish and deemed blog-worthy.

So here you are…. the ingredients and the method. The measurements in the recipe below made enough for 10-12 wing halves, a couple of handfuls of small/medium size shrimp, plus leftovers that really livened up our eggs this morning and a bit more that will probably be sprinkled on roasted cauliflower tonight.  I'm sure you can make more or even less (why?), just keep the proportions the same. Store leftovers in an air-tight container.
Enjoy!


Dry Rub Wings (& Shrimp)

Dry Rub Ingredients
  • 1 ½ tsp granulated garlic 
  • 1 ½ tsp dried thyme
  • 1 tsp kosher salt
  • 1 tsp smoked paprika
  • 1 tsp dried oregano
  • 1/2 tsp ground cumin
  • 1 tsp ground coriander
  • 1 1/2 tsp finely chopped fresh rosemary
  • 20 grinds black pepper
  • Olive oil to coat 
  • Protein of your choice: chicken wings and/or shrimp 

Method
Preheat oven to 400 degrees
Place a rack on a foil-lined baking sheet and spray it down with cooking spray
  • Mix the dry rub ingredients in a small bowl set aside
  • Pat the wings (and/or shrimp) dry with towels to remove any moisture and then toss them with a few tablespoons of olive oil in a large bowl. If you are doing both chicken and shrimp, do this in separate bowls. Then toss everybody with enough of the dry rub to coat. I do this in stages, sprinkling the rub on a little at a time and stirring gently to make sure they are evenly coated.
  • Arrange the wings/shrimp on separate prepared baking sheets and set them aside to rest for about 10-15 minutes to help the flavors develop.
  • For the chicken:  Slide the trays into the oven and roast for 25 minutes. Remove, flip each one over and then return to the oven for another 20 minutes. Remove from the oven and let rest on the wire rack for 10 minutes
  • For the shrimp: roast at the same temperature but for only 8-10 minutes, depending upon the size of the shrimp. When doing both wings and shrimp, do this while the wings are resting. The shrimp can be served right out of the oven.
  • Enjoy with celery sticks, sliced cucumbers, sliced red bell peppers and plenty of good quality or homemade bleu cheese dressing (we like Marie’s from the refrigerated section in the product department at most grocery stores). I also made a pesto dipping sauce by combining some pesto I froze during the summer with some mayo and lemon juice, which was amazing with the shrimp.

I bet you have all these ingredients
in your pantry!
Patience... wait a few minutes
before roasting for max flavor


Sunday, July 21, 2019

Crowd Pleaser (Cilantro-Lime Pepita Dressing/Dip)


We got together with friends last night for a fantastic dinner of InstantPot  pork tacos (cooked with plums and peppers - it was amazing!), great wine and conversation that ranged the gamut from belly laughs to solving the problems of the universe. So much fun.


Ready for dipping...
When I was asked to bring an app, my mind immediately went to a crisp and cool (it's freaking hot here) veggie platter. First I thought bleu cheese dip. Then I thought yogurt ranch. And then - boom!- I thought about my very favorite dressing recipe that I created way back when we lived in Brea, California. Cilantro-Lime-Pepita dressing that is reminiscent of the fantastic Mexican Caesar Salad served at the El Torito restaurant on the hill above the town, by Brea Olinda High School. 

While I often just throw this together, I wanted this batch to be just right. So, I searched the blog and couldn't find it. Thankfully I had a copy on my laptop from when I tested it for Southerly Magazine. 

So here it is, two ways - photographed as a dip and as a dressing with grilled shrimp and garnished with Cojita Cheese. (I used to put 1/8 of a cup of the cheese into the dressing, but lately I've been leaving it out and really like the light and press taste that results. Your call to leave it in or leave it out!
.... and as a salad with grilled shrimp and Cojita cheese

Here's how you can make it: 


Dressing/Dip Ingredients
(makes a little more than 1 cup, plenty for dipping with leftovers)
  • 1 large garlic clove, peeled
  • 1 7oz  Greek Yogurt (full-fat, 2%, 1% or 0% - it doesn't matter as long as it's Greek Yogurt - I use Fage brand)
  • 1 T mayonnaise
  • 1/8 cup cider vinegar
  • Juice and zest of one lime
  • 1/2 tsp kosher salt
  • ½ tsp ground black pepper
  • 1 bunch cilantro, washed, dried and stems removed (just twist ‘em off; no need to get crazy about removing every little stem)
  • 1/8 cup pepitas (Mexican pumpkin seeds, found in the nut section)
  • 1/8 cup queso fresco (Mexican cheese that you can crumble, available at most grocery stores), plus the same amount for garnish.

Dressing Directions:
In the food processor with steel blade:

  • Blitz all of the ingredients except the cilantro until smooth
  • Then add the cilantro and pulse until cilantro is finely chopped and incorporated into the mixture
  • Check the seasoning and add more salt to taste if needed.

Sunday, June 2, 2019

Happy Graduation! (Frozen Banana Bites)


It's that time of year! And around here it seems like everywhere you turn there is a freshly minted graduate -- Duke, UNC, NC State, NC Central, Elon,  -- and that doesn't even start to include the high schools. 

One of my dearest friend's daughter Maddie is one of those grads
Bite-Sized Frozen Banana? Yes, ma'am!
and is a 
proud owner of a fresh new Elon MBA. To celebrate the big day, her folks hosted a party at their home a couple of weekends ago. And what a party it was!

While the event was catered, another friend and I volunteered to bring the desserts.  Those who know me well know that I'm not big on creating desserts. And making something that would be enjoyed (or not) by 50+ people was a bit overwhelming. Thankfully my cohort in dessert crime pointed sent me this recipe 

Reminiscent of a beachside frozen banana on a stick, these frozen treats are cool, tasty and actually not bad for you! They’re also super simple to make and would make a fun rainy day project with the kiddos. While this isn’t an original recipe, it’s such a crowd pleaser that I had to share. 

Here's how you make them:

Ingredients:
Makes 20 to 45 pieces depending upon the size of the bananas. They’ll keep in the freezer for a week or two, if you can keep yourself from eating them!

  • 2-4 bananas (select just ripe ones — this is not a great use for super ripe bananas)
  • 12 oz semi-sweet chocolate, chopped (I use the kind you’ll find in the baking section; just be sure it is semi-sweet and not unsweetened)
  • 2/3 cup chopped almonds

Method
  • Line a baking sheet with wax paper and clear a space in the freezer the same size as the sheet.
  • Peel and slice the bananas into 1/2 to 3/4 inch slices.
  • Fill a sauce pan with about 3 inches of water and bring it to a simmer. Then place a glass bowl on top of the pan, put the chocolate in the bowl and stir gently until melted. When chocolate is smooth, turn off the heat but leave the bowl over the hot water.
  • Now comes the fun part - using a fork, start dunking the banana slices into the chocolate 2 or 3 at a time. Lightly shake and tap the covered slices to remove excess chocolate (if there is such a thing). 
  • Use a second fork to slide the slices onto the prepared baking sheet, sprinkle on some nuts and press them lightly to be sure they settle into the chocolate.
  • Freeze until firm (abut 20 minutes) and then remove to an airtight container and freeze for up to two weeks.  Serve Frozen. 

Enjoy!


Saturday, March 23, 2019

Celebrating Spring! (Chicken Primavera Risotto)

Asparagus, carrots, peas and chicken make a tasty
risotto that celebrates Spring
When we lived in SoCal, we took Spring for granted. Basically it meant that you could bring out your white pants and shoes. And there were Easter Lillys at the grocery store. 

Here in North Carolina, things are soooo different. The trees are popping with flowers and the neighborhood is awash with yellow daffodils and pink tulips. Windows are also thrown open, at least until the pollen hits. But that's a small price to pay for the incredible leafing out hardwood trees that provide perfect shade for lazy summer afternoons in a hammock.

So when I had to come up with a recipe for the May issue of Southerly (our neighborhood magazine) the following dish was an easy choice. Cheers to Spring! And bring on all things primavera!


Chicken Primavera Risotto
Serves 4-6

Ingredients
  • 5 1/2 cups chicken stock. If you only have a standard 4-cup box of broth, add in 1 1/2 cups of water and some garlic and/or poultry season to stretch it.
  • 3 boneless, skinless chicken thighs, cut into pieces and seasoned with salt and pepper
  • 3 Tbs Butter, divided
  • 2 Tbs olive oil
  • ½ cup onion, 1/4 inch dice
  • 1 ½ cups Arborio rice
  • ½  cup dry white wine 
  • 10 thin or 8 thick spears of asparagus, cut into ½ inch pieces
  • 1 cup frozen peas, uncooked
  • 1/2 cup each of diced carrots, onions, and halved cherry tomatoes
  • 1/8 cup chopped parsley
  • 1/2 cup Parmesan cheese, grated
  • 1/2 tsp poultry seasoning (or a few sprigs of thyme chopped)
  • Salt and Pepper to taste
  • Additional Parmesan cheese and cracked black pepper for garnish.

Method
  • Bring the chicken stock to a boil and then reduce the heat to low
  • Heat the olive oil in a large sauce pan or medium sized Dutch oven heat the olive oil and then brown the chicken in two batches until cooked through; remove to a bowl.
  • Now add the 2 tbs of the butter to the pan and sautĂ©  the onion and carrots until the onions are translucent; then add the rice and stir until coated. Raise the heat to medium high and pour in the wine, stirring until fully absorbed. Then begin to add hot chicken stock in ½ cup increments, stirring now and then until absorbed before adding more. Hint: it’s time to add liquid when a spoon dragged thru the mixture creates a “canyon.” 
  • After about 10 minutes add the asparagus, tomatoes, peas, poultry seasoning and chicken. Continue adding broth as above, stirring to keep the rice from sticking to the bottom of the pot. After about 10 more minutes the rice will be tender, but still firm. At this point, add any remaining stock and stir until it is mostly absorbed, but still loose.
  • Now you are ready to finish the dish. Turn off the heat and vigorously stir in the  the remaining 1 Tbs of  butter, parsley and cheese.  Season with salt and pepper to taste.  Serve with additional Parmesan cheese and black pepper.


Enjoy.

Saturday, February 2, 2019

Fancy but not Fancy (Beef Stroganoff Two Ways)

Dinner Party Ready, with filet mignon
and brandy
Beef Stroganoff. It just sounds fancy. But in reality, it’s one of the easiest dishes to cook for a holiday (we had it for Christmas Dinner last year), date night in, or yes, a quick weeknight meal. Here’s a two-in-one recipe — you can make it with ground beef or you can get fancy with filet mignon and good dose of brandy. You take your pick which one to serve to the kiddos on a Wednesday night!

Beef Stroganoff Two Ways
Serves 4-6

Easy Week Night Dinner, with
ground beef and sans brandy (or not!)

Ingredients
  • 1 lb. filet mignon cut into bite sized pieces and seasoned with plenty of Kosher salt and ground black pepper (or 1 lb. ground beef)
  • 3/4 cup chopped onion
  • 1 lb. mushrooms
  • 3/4 cup sour cream 
  • 1 1/2 cups beef broth + an additional 1/2 cup combined with 2 TBS of corn starch to make a “slurry"
  • 3/4 cup brandy + a splash more to add at the end (you can leave this out for the weeknight version)
  • 1 TBS dijon mustard
  • 2  TBS corn starch combined with 1/2 beef broth to make a “slurry”
  • 2 TBS olive oil
  • 4TBS butter, divided
  • Salt and Pepper to season the meat
  • 1 bag Egg noodles, cooked according to the package directions, drained
  • 1/2 cup parsley, chopped
Method:

  • Heat the oil in a large skillet on a high heat and brown the meat. If you are using steak, do it in two batches, being careful not to over cook! Just get some color and then remove the meat to a foil-covered bowl covered. If you are using ground beef, break it up with a wooden spoon, but keep the pieces fairly large, rather than small crumbles. Season it with a good pinch of Kosher salt and some ground black pepper about half way through. Remove to paper towel lined bowl to drain. Cover with foil. 
  • Add 2 TBS of the butter to the pan and sautĂ© the onions and mushrooms over a medium heat until they are soft. Then stir in the dijon mustard. 
  • Next pour in 1 1/2 cups of the beef broth, plus the brandy if you are using it. Bring this mixture to a boil and then spoon in the cornstarch slurry. Stir to combine and thicken. 
  • Now adjust the heat to medium-low, add in the meat and any juices, and gently stir in the sour cream. Taste and adjust the seasoning with salt and pepper as needed. (I like to add another 2 TBS of brandy as well).
  • Serve over noodles that have been tossed with the remaining 2 TBS of butter and the parsley.

Enjoy!

Saturday, November 10, 2018

New Years Resolutions in November (Cast Iron Roasted Salmon with Dill Yogurt Sauce)

A little over a year ago, I was asked to contribute monthly recipe for Southerly, a community magazine for the neighborhoods in the Croasdaile area of Durham, NC. It’s a sweet little magazine, with stories about local families and businesses and a recipe from yours truly. It’s been a fun addition to my recipe writing hobby, and I’ve learned quite a bit in the process. 

Perfectly crispy on the outside and moist on the inside
It may be November, but our January deadline is looming. So today, I put pen to paper and did a measurement test and photo session (i.e. open the shutters and pray for good light - photographing food is REALLY difficult!) of one of our favorite weekday dishes, oven roasted salmon in a cast iron skillet. I gussied it up a tad with a yogurt dill sauce. Perfect for our readers who want to stay true to their New Years resolutions, come 2019.

The best part of this little project was the tasting - this salmon is so moist, the skin so crispy and the dill sauce is down right relish. I can't wait to finish this blog post so I can enjoy the rest of it!

Here’s how you do it:

Cast Iron Skillet Salmon with Yogurt Dill Sauce

Ingredients:
For the fish
  • 1 salmon portion for each person to be served - get the thick rosy pink salmon portions from Trader Joes or Whole Foods (not the thin dark orangey red ones)
  • Olive oil (to coat both sides of each portion)
  • Kosher salt (a good pinch per portion)
  • Fresh cracked black pepper (about 6 grinds per portion)

Yogurt Dill Sauce 
  • 1 6 oz container of fat free strained plain Greek yogurt
  • The zest and juice of a lemon
  • 1TBS finely chopped fresh dill
  • 1/8 tsp Kosher salt
  • 1/8 tsp onion powder
  • 10 grinds of black pepper


Method:

  • Put a cast iron skillet large enough to fit the fish without crowding into a cold oven. Set the even to 450 degrees and turn it on. 
  • As the oven and skillet come up to temp, blot the fish dry with a paper towel and drizzle both sides with olive oil. Smear the oil around a tad and sprinkle the flesh side with a good pinch of salt and about 6 grinds of black pepper.
  • Also use this time to whisk all of the ingredients for the yogurt dill sauce together in a small bowl and set it aside.
  • When the oven comes to temp, put on two kitchen mitts and CAREFULLY take the skillet out and place it on the stove, with the gas burner* set to a medium high heat. Place the fish in the skillet, flesh side down. Set a timer for 4 minutes and let the fish sear. Do not touch or move it. Trust me, it won’t stick or burn. 
  • At the end of four minutes, use a metal spatula flip the fish so it’s skin side down and put the skillet back into the oven. Set the timer for 5 minutes.  (Note:  I wear a kitchen mitt on one left hand and hold the spatula in the other, to make sure I don’t touch the hot pan when turning the fish, and then put both mitts on to put the skillet in the oven)
  • AT the end of 5 minutes, put those mitts back on and remove the skillet from the oven. Immediately move the fish to serving plates so it won’t continue to cook in the hot pan.
  • Serve with the dill sauce and enjoy!
*This recipe has only been tested using a gas stove. Consult the manufacturer of your electric cooktop before placing a hot skillet on the glass surface, to ensure that it does not crack.

Monday, July 30, 2018

Y'all Come! (Carolina Taquitos with SoCal Slaw)

Carolina Taquitos with SoCal Slaw 
Makes 12 taquitos - 4 entrée servings or appetizers for 6-8 people

We love having folks come to visit. Full stop. It’s like combining the best of two worlds - our wonderful area here in Durham, with friends and family from SoCal, work friends from around the world, our son (who now lives in Florida). You name it. We’ll take it. We love having company.
A taste of home - both SoCal and North Carolina

With this as a backdrop, you’ll understand how happy we were when our SoCal friend Sheryl (and my BFF from Cal State Fullerton) decided to come for a long weekend. This was her fourth trip in the nine years (!) we’ve live here, so she already knows the drill. But as Durham continues to evolve, we continue to have new places to go, areas to explore. It’s a blast.

Her arrival also gave me an excuse to try out a recipe I’ve been writing, which transforms the vinegary and slightly sweet and spicy pork barbecue that is common here into crispy crunch taquitos like the ones we loved in SoCal, served up with a refreshing lime and cilantro coleslaw and guacamole. Oh yeah.

We made the dish last night. It earned a Steve Barnett “Home Run, Honey!” In fact, he said it might just be a grand slam! So here it is for you.  

Here's how you do it.

For the taquitos
12 corn tortillas (try to get fresh corn tortillas from a Mexican market, but packaged tortillas from the store will do.
1 pound of barbecue pulled pork (we get this from the barbecue place up the road) 
1/2 cup Carolina vinegar-based barbecue sauce (if your pork comes unseasoned with sauce)
Corn oil to fill a skillet to 3/4 of an inch
toothpicks for securing the taquitos while frying (2 per taquito)

Garnishes - take your pick, or do them all:
Guacamole - fresh or pre-made (for a quick guac, mash a ripe avocado with the juice of 1/2 a lime, about a TBS each of diced onion, and cilantro, plus a good pinch of salt and a bit of your favorite hot sauce or salsa)
Sour cream
Mexican queso fresco (dry white cheese that crumbles well) or shredded cheddar cheese f

Method:
  • Break up the barbecue into thin bite sized pieces and mix in the sauce. Set aside
  • For each taquito, 
  • Warm a tortilla for about 10-seconds per side over a gas flame or dry frying pan to make them pliable and easy to roll. 
  • Put about 2 TBS of the barbecue mixture on a tortilla, towards one side. Then working from that side, roll the tortilla over the barbecue like a cigar. Push two toothpicks through to secure, leaving long on one side.This will come in handy when frying.
  • To fry, heat the oil in a heavy skillet until a piece of a tortilla that is placed in the oil begins to bubble. Then use tongs to carefully place 3 taquitos in the oil, seam side down and long end of the toothpick up, into the oil. Fry until golden brown (about 45 seconds) then pull out the toothpicks and flip to fry the other side until done (about 30 seconds). Remove to drain on paper towels. 
  • Serve with a small pile of the slaw and garnishes of your choice.


For the slaw
1/4 cup sweet onion, quarter-inch diced
1/3 cup mayonnaise
1 lime, juiced (about 2 TBS)
1 1/2 TBS jalepeno, seeded and diced
1/4 tsp kosher salt
15 grinds black pepper
1/4 level tsp coriander 
1/4 level tsp cumin
1 14 oz bag of tricolor coleslaw mix (red and green cabbage with carrots - no dressing)
2/3 cup cilantro, finely chopped

Method
  • Mixture first eight ingredients in a large bowl until well combined. 
  • Add the bag of cabbage/carrot slaw mix and the cilantro
  • Stir well and chill at least 30 minutes

Enjoy.